


New Mibo A-10 Gen 5.5
 04-18-2015, 10:43 AM
#1

Thread Starter

Dear all.
This is a thread introducing the new Mibo Gen 5.5 A-10.
Although the kit has been on sale for a couple of months now, it took me some time to get the pictures of the upgrades and modifications to show you.
http://www.ultimate-jets.net/product...-warthog-gen-5
The Gen 5.5 main features are:


This optimizes the trust line and virtually eliminates the pitch down effect found on bigger engine options. Also since the thrust tube is streamlined with the engine, no thrust loss is present . This setup provides the same thrust level as the 140 N engine with a weight saving of about 4 lbs ( lighter engine, no ballast weight in the nose, smaller fuel tanks ).
The picture below shows the areas modified from the previous gen in grey.

B-100F installed:

Engine: It uses our MIL SPEC light weight silver/ PTFE wires as well as 12 way connectors for the pod interface. The loom is protected in our high temperature wrap-around sleeve and labeled at both ends. All connections are professionally crimped and labeled. Servo plugs are JR type industrial grade MOLEX branded.
The fuselage pods can disconnect within seconds, with 3 connections, rendering maintenance and transport very easy.

An engine accessory tray is provided with a set of turbine accessory holders. It houses the air traps, ECU, pump and valves. It is placed in front of the fuel tanks and main wing bulkhead for CG optimization.
The long tubes to the engines are on the pressure side of the pump. Tubing upstream the pumps are of minimal length and use large bore Tygon to avoid cavitation.


The new antenna kit is as below:


http://www.ultimate-jets.net/collect...-servo-bracket

Here is a video of dry fitting the A-10 out of the box:
https://www.youtube.com/watch?feature=player_embedded&v=YOxGSrqDTpE
This is a thread introducing the new Mibo Gen 5.5 A-10.
Although the kit has been on sale for a couple of months now, it took me some time to get the pictures of the upgrades and modifications to show you.
http://www.ultimate-jets.net/product...-warthog-gen-5
The Gen 5.5 main features are:
- Lighter layup and maximum thrust allowed 140N.
- Main gear struts molded from Epoxy resin.
- New install kit for Behotec B-100F with streamlined 6 degree pipe.
This optimizes the trust line and virtually eliminates the pitch down effect found on bigger engine options. Also since the thrust tube is streamlined with the engine, no thrust loss is present . This setup provides the same thrust level as the 140 N engine with a weight saving of about 4 lbs ( lighter engine, no ballast weight in the nose, smaller fuel tanks ).
The picture below shows the areas modified from the previous gen in grey.
- MIL Spec loom: this option is available for the B-100F ( engine loom ) and the servos ( conventional receiver type loom ).
Engine: It uses our MIL SPEC light weight silver/ PTFE wires as well as 12 way connectors for the pod interface. The loom is protected in our high temperature wrap-around sleeve and labeled at both ends. All connections are professionally crimped and labeled. Servo plugs are JR type industrial grade MOLEX branded.
The fuselage pods can disconnect within seconds, with 3 connections, rendering maintenance and transport very easy.
An engine accessory tray is provided with a set of turbine accessory holders. It houses the air traps, ECU, pump and valves. It is placed in front of the fuel tanks and main wing bulkhead for CG optimization.
The long tubes to the engines are on the pressure side of the pump. Tubing upstream the pumps are of minimal length and use large bore Tygon to avoid cavitation.
- New scale accessories: A new top fuselage antenna is provided.
The new antenna kit is as below:
- New LED kit:
- New operating side hatch for switch. This side hatch has been made operating to enable fitting your main switch ( RX switch ). It features a piano hinge and magnet.
- USB Servo mounts: the kit comes with a set of PYCABS printed servo brackets custom sized for the JR 8711 servo which is the recommended item for this plane.
http://www.ultimate-jets.net/collect...-servo-bracket
- Deceleron: Fully functional split ailerons are being tested right now and will be released very soon.
Here is a video of dry fitting the A-10 out of the box:
https://www.youtube.com/watch?feature=player_embedded&v=YOxGSrqDTpE
Last edited by olnico; 04-18-2015 at 10:49 AM.

 04-18-2015, 01:19 PM
#3

My Feedback: (15)
Hi Oli,
This looks great. So what can I "add" to my Gen 5 to make it 5.5? I think that I have most things but would like to see about the epoxy strut covers?
Are the struts and springs the same?
I also would love to see how you assemble the nose gear lights to the strut.
Great kit!
DD
This looks great. So what can I "add" to my Gen 5 to make it 5.5? I think that I have most things but would like to see about the epoxy strut covers?
Are the struts and springs the same?
I also would love to see how you assemble the nose gear lights to the strut.
Great kit!
DD
04-18-2015, 08:01 PM
#4
Thread Starter
Hi Dave.
No, they are not the same. Struts and springs have changed.
The new struts include a 3 spring progressive damping instead of 2 on gen 5.0 and below.
To upgrade your struts to gen 5.5, you would need to cut your actual mockups, sand down the aluminum strut to remove glue, slide the new epoxy mockup and then change the internal springs.
The other elements that can be added are the new scale antennas, switch box, new LED light and scale features and later on descelerons ( when ready ).
 04-19-2015, 05:35 AM
#6
My Feedback: (15)
Thanks Oli,
I might consider the switch box/hinge/door. I am not sure about changing the strut covers for my "fun" flying".
Do you have any pictures or instructions for assembly of the nose gear lights?
Thanks as always for your support!
Dave
I might consider the switch box/hinge/door. I am not sure about changing the strut covers for my "fun" flying".
Do you have any pictures or instructions for assembly of the nose gear lights?
Thanks as always for your support!
Dave
Hi Dave.
No, they are not the same. Struts and springs have changed.
The new struts include a 3 spring progressive damping instead of 2 on gen 5.0 and below.
To upgrade your struts to gen 5.5, you would need to cut your actual mockups, sand down the aluminum strut to remove glue, slide the new epoxy mockup and then change the internal springs.
The other elements that can be added are the new scale antennas, switch box, new LED light and scale features and later on descelerons ( when ready ).
No, they are not the same. Struts and springs have changed.
The new struts include a 3 spring progressive damping instead of 2 on gen 5.0 and below.
To upgrade your struts to gen 5.5, you would need to cut your actual mockups, sand down the aluminum strut to remove glue, slide the new epoxy mockup and then change the internal springs.
The other elements that can be added are the new scale antennas, switch box, new LED light and scale features and later on descelerons ( when ready ).
04-19-2015, 09:07 AM
#7
Thread Starter
The new nose gear lights are slightly different and more scale.
However here are a few pictures that might help you. I do not have the instructions yet.
04-19-2015, 09:11 AM
#8
Thread Starter
Thanks Anurag.
A complete description of Gen 5.5 upgrades with lots of detail pictures are available on my blog:
http://www.ultimate-jets.net/blogs/j...-5-5-mibo-a-10
04-21-2015, 11:03 PM
#9
Thread Starter
Some update on the loom options:
Engine loom:
It uses our MIL SPEC light weight silver/ PTFE wires as well as 12 way USC connectors for the pod interface. The loom is protected with our high temperature MIL spec wrap-around sleeve and labeled at both ends with aero grade printed heat shrinks. All connections are machine crimped and labeled.
The fuselage pods can disconnect within seconds with 1 plug, rendering maintenance and transport very easy.

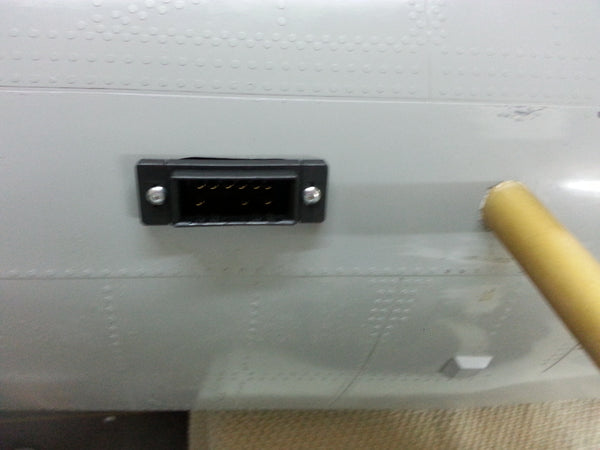
A view of the engine pod USC which connect COM, starter and plug power lines.

An engine accessory tray is provided with a set of turbine accessory holders fro the B-100F. It houses the JMP Medium air traps, ECU, pump and valves. It is placed in front of the fuel tanks and main wing bulkhead for CG optimization.
The long tubes to the engines are on the pressure side of the pump. Tubing upstream the pumps are of minimal length and use large bore Tygon to avoid cavitation.

Servo loom.
It consists of 3 harnesses. Right wing, left wing and tail.
The wings are connected with our 20 way USC. The fuselage side is using a flanged plug that is screwed with two button head sheet metal fasteners.
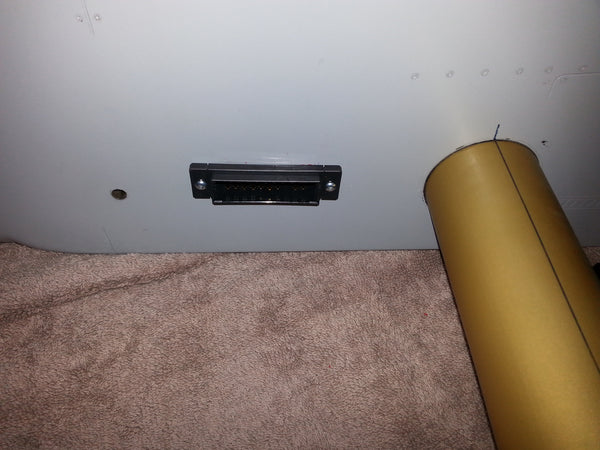
The wing side is using one floating male plug.

The 20 way USC connects: all wing servos, the LEDs, the gear lines, the brake lines. No other connection is required.
The tail loom uses one 16 way USC plug. It connects: 2 rudder servo, 2 elevator servos, 2 LED lights.
The loom comes fully crimped and protected with our MIL spec wrap around sleeve.
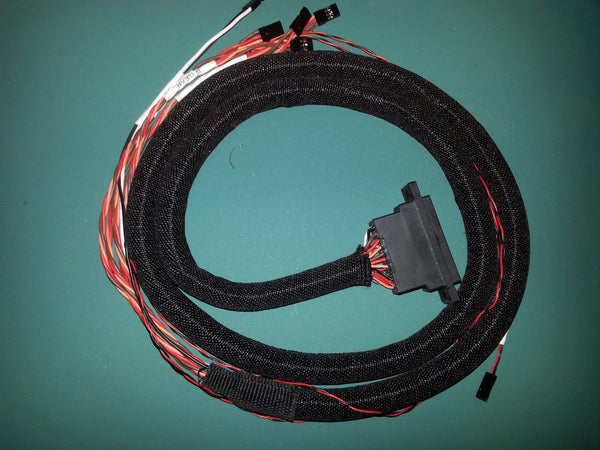
It is fastened into the fuselage by the means of our PYCABS clips.

All the servo plugs are machine crimped JR type industrial grade MOLEX branded. All servo ends are labelled with aero grade printed heat shrink labels.

The wrap around ends are stabilized with woven heat shrink tubes and siliconed. The loom can be opened, modified and re-closed at the user's convenience.
Engine loom:
It uses our MIL SPEC light weight silver/ PTFE wires as well as 12 way USC connectors for the pod interface. The loom is protected with our high temperature MIL spec wrap-around sleeve and labeled at both ends with aero grade printed heat shrinks. All connections are machine crimped and labeled.
The fuselage pods can disconnect within seconds with 1 plug, rendering maintenance and transport very easy.
A view of the engine pod USC which connect COM, starter and plug power lines.
An engine accessory tray is provided with a set of turbine accessory holders fro the B-100F. It houses the JMP Medium air traps, ECU, pump and valves. It is placed in front of the fuel tanks and main wing bulkhead for CG optimization.
The long tubes to the engines are on the pressure side of the pump. Tubing upstream the pumps are of minimal length and use large bore Tygon to avoid cavitation.
Servo loom.
It consists of 3 harnesses. Right wing, left wing and tail.
The wings are connected with our 20 way USC. The fuselage side is using a flanged plug that is screwed with two button head sheet metal fasteners.
The wing side is using one floating male plug.
The 20 way USC connects: all wing servos, the LEDs, the gear lines, the brake lines. No other connection is required.
The tail loom uses one 16 way USC plug. It connects: 2 rudder servo, 2 elevator servos, 2 LED lights.
The loom comes fully crimped and protected with our MIL spec wrap around sleeve.
It is fastened into the fuselage by the means of our PYCABS clips.
All the servo plugs are machine crimped JR type industrial grade MOLEX branded. All servo ends are labelled with aero grade printed heat shrink labels.
The wrap around ends are stabilized with woven heat shrink tubes and siliconed. The loom can be opened, modified and re-closed at the user's convenience.
08-22-2015, 02:16 PM
#14
Hello Oli
The Pics are from my Mibo Gen 4 Kit

I Customized the Mockupkit with original Scalecomponents
I shoot over 3000 pics from OriginalPlanes an Copy all the small Details.
09-01-2015, 12:23 AM
#15
Thread Starter
Here are some details of the new Gen 5.5 light kit.
It includes ultra-bright LEDs of 1 W to 2.2 W and new super scale taxi lights with optical grade reflectors.
The wing tip fixtures are updated to the new larger heat sinks.
http://www.ultimate-jets.net/product...-led-light-kit
It includes ultra-bright LEDs of 1 W to 2.2 W and new super scale taxi lights with optical grade reflectors.
The wing tip fixtures are updated to the new larger heat sinks.
http://www.ultimate-jets.net/product...-led-light-kit
02-14-2016, 07:02 AM
#16
My Feedback: (15)
Hi all,
i am building my second A10 but the last one was several years ago.
i am wondering what servo arms are working for flaps and ailerons.
i think the HD 8711 plastic arm should be fine for the flaps, I plan to use an SWB metal arm with ball link though for the ailerons.
i did all metal arms on my last one and I think it was overkill on a few surfaces..
Anyway., it would be nice to know what is working for all of you.
thanks
dave
02-14-2016, 11:26 AM
#17
Member
Join Date: Dec 2007
Location: Northfield, MN
Posts: 63
Likes: 0
Received 0 Likes
on
0 Posts
I use these MKS carbon/aluminum arms. They're about two inches in length
. Just drill the hole where you need. Check the ESPRIT or MKS website for details
Cheers,
Joe Grice
06-17-2016, 05:20 AM
#18
Hey guys, sorry to bump this thread. Appointment is set and hopefully I'll pickup my Mibo A10 in 2 weeks !
I ordered everything, building, servos, lights, ordnance etc ... All options Bogo is offering except the cargo pod and rocket launchers.
For the owners, can you post pictures of your tanks and plumbing setup ?
I've ordered a Royal SRS with 2 Jeti RX, it is working great on the bench and I'll install it asap but for the plumbing, UAT catch tank, I'm not yet decided and might struggle with these. For the turbines choice, I'll go with 2 Merlins M140, but need to wait a few for budget ....
Thanks for sharing your tips
In the meantime let me show you some pictures of what I've done on my side
AGM65 Maverick with some added details, GBU12 and AGM114 Hellfire.


I'm finishing printing 2 CBU 52, I'll post pictures later.
Regards,
Jim
I ordered everything, building, servos, lights, ordnance etc ... All options Bogo is offering except the cargo pod and rocket launchers.
For the owners, can you post pictures of your tanks and plumbing setup ?
I've ordered a Royal SRS with 2 Jeti RX, it is working great on the bench and I'll install it asap but for the plumbing, UAT catch tank, I'm not yet decided and might struggle with these. For the turbines choice, I'll go with 2 Merlins M140, but need to wait a few for budget ....
Thanks for sharing your tips
In the meantime let me show you some pictures of what I've done on my side
AGM65 Maverick with some added details, GBU12 and AGM114 Hellfire.
I'm finishing printing 2 CBU 52, I'll post pictures later.
Regards,
Jim
06-17-2016, 10:43 AM
#20
(Deceleron: Fully functional split ailerons are being tested right now and will be released very soon. )
Oli,
Is the Deceleron still in the works?? I hope it is and I am wondering when this will come available?
Thanks
Joe
Oli,
Is the Deceleron still in the works?? I hope it is and I am wondering when this will come available?
Thanks
Joe
06-17-2016, 11:50 AM
#21
Hey Alan, thanks for your answer. As the building is almost done, I don't think I'll be able to switch to the air version. I'll ask Bogo for some advice on this and will keep this thread updated.
06-17-2016, 06:30 PM
#22
My Feedback: (6)
Hi Jim
I didn't fully answer your question you had about fuel tank system. I am using Jetcat RXI 140's and they work very well with this airframe. I fly at 3500 asl and so I need to be able to have the power on those hot days off the runway. I am using the Jet Tech fuel cell. It holds 300 oz or 8.8l. I including a picture of it. It fits very nicely in the middle hatch area. I am also using BVM UAT's. Some may say they don't work well but I have never had a flame out because of them.
I also used a Royal SRS. I have had it for a while. I don't think you need it for the I gyro part of it, because this big bird just doesn't need it. But the sequencer works so easily on it. Easiest sequencer you will ever program. Also great for the set up of using the SRS part of it. I really like using it.
Alan
Last edited by AKB; 06-17-2016 at 06:56 PM.
06-20-2016, 05:48 AM
#25
My Feedback: (6)
HI Dave
Glad to hear from you. Yes it flies very well as you might know. The electric brakes are non existant. Wouldn't stop a 10 lb airplane let alone a sizable A-10. Can't tell you much as supposedly the packadge is in Calgary today. I am not sure if is a servo mechanical or an electronic valve. I will let you know more if I get it devlivered today.
Jimibar- I will get you some photos once I do a little organizing inside once the brake installation is installed. The installation is a bit of a mess until I get this figured out and installed.
Alan

