


Ziroli SBD-3 Dauntless build

 01-11-2021, 02:38 PM
#78

Join Date: Nov 2016
Posts: 13
Likes: 0
Received 0 Likes
on
0 Posts
There are 8 rubber grommets between the engine and the fire wall mount now. From what Ive heard from friends and read online, it has really reduced the vibration. I havent made it to that stage in my build yet, but the research I did made me feel confident with it.
 06-28-2021, 10:22 PM
#81
Thread Starter
Join Date: Sep 2014
Location: Scottsdale, AZ
Posts: 169
Likes: 0
Received 0 Likes
on
0 Posts
I'm finally back at the SBD. All is well. Just busy on another plane at another place.
In the meantime, maybe like some of you, I've been following the SBD-4 build thread by boB on RCSB. It's pretty amazing and, well, makes me wonder why I even post any longer. I spent the last few days going through his build, making an index, and taking notes on things I want to incorporate into my build. It also serves as an outline for the order of the things that remain.
Where we left off last was that everything had an initial layer of primer.

The fuselage is looking good. I need to add another layer of primer and work a sanding bar over the surface. I also plan to replace the windshield frame with a built up CF strip.

The canopy fits well. I'll make a frame using the method Sam outlined.

I need to make layups for both ammo hatches. This is where boB planned to have fuel & air lines, switches etc.
In the meantime, maybe like some of you, I've been following the SBD-4 build thread by boB on RCSB. It's pretty amazing and, well, makes me wonder why I even post any longer. I spent the last few days going through his build, making an index, and taking notes on things I want to incorporate into my build. It also serves as an outline for the order of the things that remain.
Where we left off last was that everything had an initial layer of primer.
The fuselage is looking good. I need to add another layer of primer and work a sanding bar over the surface. I also plan to replace the windshield frame with a built up CF strip.
The canopy fits well. I'll make a frame using the method Sam outlined.
I need to make layups for both ammo hatches. This is where boB planned to have fuel & air lines, switches etc.
06-28-2021, 10:41 PM
#82
Thread Starter
Join Date: Sep 2014
Location: Scottsdale, AZ
Posts: 169
Likes: 0
Received 0 Likes
on
0 Posts
I made a stand for the canopy using some blocks.
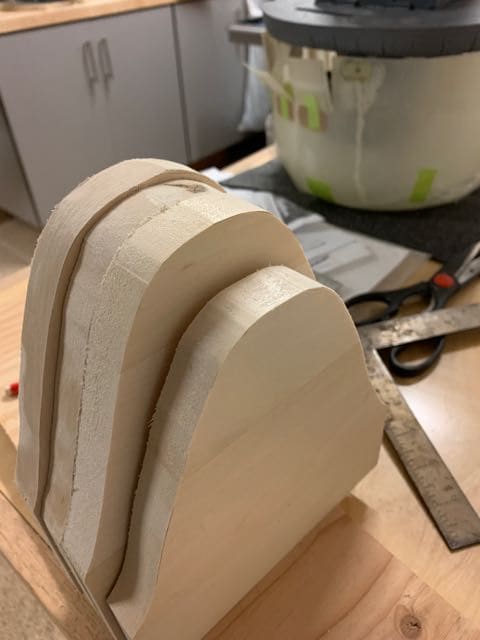
Here's the rough cut before shaping. The two in the middle will need to be the same.

I will attach the front windshield using packaging tape (on the inside)
You will need to do some measuring to create the steps in the reductions of the canopy moving from front to back
Here's the rough cut before shaping. The two in the middle will need to be the same.
I will attach the front windshield using packaging tape (on the inside)
You will need to do some measuring to create the steps in the reductions of the canopy moving from front to back
06-28-2021, 10:47 PM
#83
Thread Starter
Join Date: Sep 2014
Location: Scottsdale, AZ
Posts: 169
Likes: 0
Received 0 Likes
on
0 Posts
I saw where some guys use CF strips to add strength to the canopy. In my case, it was a P-47 build by Detlef Kunkel. (also an impressive build) I'm still kicking around the idea he used for the cowl flaps, and coincidentally how I built my F4U-5 flaps as well. Back to the canopy.

I used saran wrap over the canopy. I didn't have any spray mold release and I feel more confident with the wrap. Plus I don't really care about wrinkles on the inside of the frame. Here, I cut some CF strips to reinforce in the frame area. I used a Sharpie to mark the frame on the Saran wrap.

I used 3oz crowsfoot FG - two layers, with the CF in between. I plan to do one section of the canopy at a time.
I used saran wrap over the canopy. I didn't have any spray mold release and I feel more confident with the wrap. Plus I don't really care about wrinkles on the inside of the frame. Here, I cut some CF strips to reinforce in the frame area. I used a Sharpie to mark the frame on the Saran wrap.
I used 3oz crowsfoot FG - two layers, with the CF in between. I plan to do one section of the canopy at a time.
Last edited by BatteryBob; 06-29-2021 at 03:36 PM.
06-28-2021, 10:50 PM
#84
Thread Starter
Join Date: Sep 2014
Location: Scottsdale, AZ
Posts: 169
Likes: 0
Received 0 Likes
on
0 Posts
And while I was mixing up epoxy, I made the ammo hatches

This is 2 layers of 3oz FG with a 6oz CF in between, finished with a 1.4oz FG.

Here I added the linkage chutes that are just ahead of the shell discharge chutes.
This is 2 layers of 3oz FG with a 6oz CF in between, finished with a 1.4oz FG.
Here I added the linkage chutes that are just ahead of the shell discharge chutes.
06-30-2021, 04:46 PM
#86
Thread Starter
Join Date: Sep 2014
Location: Scottsdale, AZ
Posts: 169
Likes: 0
Received 0 Likes
on
0 Posts
Thanks. It was hard setting the Corsair down for a bit. I'm hoping to have the new engine in hand when I get back to that build.
I'm still looking over notes to figure out what I should be doing next. Funny thing - i had a handwritten list of notes from boB's build with page numbers. I knew that the admin would go through threads and clean out comments, but did not think about the impact to the page numbering. There's a bit of compression that takes place. So the notes I have, while sequential, will only have accurate page numbers for a short bit of time.
Any way, I think I will need to get on with more sanding and priming to get the major sections ready for panel lines. This will come before detailing the lower center section with tanks etc, and adding wingtip lights and other detail.
I was able to get the ammo hatches cut.

My best approximation for the size and location using my reference books.

Cut to fit using a tin snips. I like this over a dremel wheel and can only get away with the snips on thinner layups.

If tape were a good hinge, I'd be done.

I cut these hinges and was relieved that it just happen to come out to an even number of sections (knuckles?). I always replace the center wire with a smaller wire.
I'm still looking over notes to figure out what I should be doing next. Funny thing - i had a handwritten list of notes from boB's build with page numbers. I knew that the admin would go through threads and clean out comments, but did not think about the impact to the page numbering. There's a bit of compression that takes place. So the notes I have, while sequential, will only have accurate page numbers for a short bit of time.
Any way, I think I will need to get on with more sanding and priming to get the major sections ready for panel lines. This will come before detailing the lower center section with tanks etc, and adding wingtip lights and other detail.
I was able to get the ammo hatches cut.
My best approximation for the size and location using my reference books.
Cut to fit using a tin snips. I like this over a dremel wheel and can only get away with the snips on thinner layups.
If tape were a good hinge, I'd be done.
I cut these hinges and was relieved that it just happen to come out to an even number of sections (knuckles?). I always replace the center wire with a smaller wire.
07-01-2021, 08:25 PM
#87
Thread Starter
Join Date: Sep 2014
Location: Scottsdale, AZ
Posts: 169
Likes: 0
Received 0 Likes
on
0 Posts
Progress today - sanding the wings. I wish I had the air source to power a air knife/orbital sander like boB. I used the long dura-block sanding bar.

I have a few low spots that need to be filled. Mostly looking good. It's hard to believe the wings look this good based on the disaster at the start. Some times it best to just hang in there. Except when it comes to the canopy frame layup that I made. I'm pretty sure I will need to redo that one, using 3 layers of 3oz crowsfoot FG (again, stealing from boB). I think I'd also like to try a release spray over the saran wrap.

The cut lines for the gear bezel/flange. The gear will need to be installed for the horizontal cut line. I think I'm done with the wheel wells for now.

Thin G10 was used to box out the small chutes. All my SBD scale pictures show that these chutes are flush so I'll sand the G10 smooth. I'd also like to close the gap on the fuselage/wing joint and make the transition a little smoother.
The fuselage will get the sanding bar treatment next. I have a few bubbles to fix.
I have a few low spots that need to be filled. Mostly looking good. It's hard to believe the wings look this good based on the disaster at the start. Some times it best to just hang in there. Except when it comes to the canopy frame layup that I made. I'm pretty sure I will need to redo that one, using 3 layers of 3oz crowsfoot FG (again, stealing from boB). I think I'd also like to try a release spray over the saran wrap.
The cut lines for the gear bezel/flange. The gear will need to be installed for the horizontal cut line. I think I'm done with the wheel wells for now.
Thin G10 was used to box out the small chutes. All my SBD scale pictures show that these chutes are flush so I'll sand the G10 smooth. I'd also like to close the gap on the fuselage/wing joint and make the transition a little smoother.
The fuselage will get the sanding bar treatment next. I have a few bubbles to fix.
07-03-2021, 04:59 PM
#88
Thread Starter
Join Date: Sep 2014
Location: Scottsdale, AZ
Posts: 169
Likes: 0
Received 0 Likes
on
0 Posts
Still mid-way in the priming step. Finding a few low spots here and there. Trying to get any important detail in place.

A little bit of fill required where the raft hatch was to be.
The ammo hatches were epoxied to the hinge. Now the hinge needs to be epoxied to the fuselage and I'll need to work on fitting the magnet in place

I did some research on the upper flap area of the center section. I added the angle supports that face toward the center.

Polystyrene sections (.080") were added in the respective bays.

This is how it looks with a thin coat of flat white primer. For scale purposes, this works for me. And will only be seen if I'm working on it upside down at the field with the flap off. Or if we're picking up pieces. So why do we do this?
I also needed to pull a cap off of one of the ribs and lower it. I found, using some thin paper, that flap was hitting one of the upper ribs, preventing the flap from fully closing.
A little more filler, and a little more primer and I might be ready to draw on the panel and rivet lines.
A little bit of fill required where the raft hatch was to be.
The ammo hatches were epoxied to the hinge. Now the hinge needs to be epoxied to the fuselage and I'll need to work on fitting the magnet in place
I did some research on the upper flap area of the center section. I added the angle supports that face toward the center.
Polystyrene sections (.080") were added in the respective bays.
This is how it looks with a thin coat of flat white primer. For scale purposes, this works for me. And will only be seen if I'm working on it upside down at the field with the flap off. Or if we're picking up pieces. So why do we do this?
I also needed to pull a cap off of one of the ribs and lower it. I found, using some thin paper, that flap was hitting one of the upper ribs, preventing the flap from fully closing.
A little more filler, and a little more primer and I might be ready to draw on the panel and rivet lines.
07-06-2021, 10:08 AM
#89
Thread Starter
Join Date: Sep 2014
Location: Scottsdale, AZ
Posts: 169
Likes: 0
Received 0 Likes
on
0 Posts
All the parts have been primed, sanded removing a great deal of the primer & filled, followed by a second coat of primer. I'm going to let this cure over a few days as the humidity here is always on the high side and it's also pretty cool. My intention is to sand to a fairly fine grit before laying out the panel and rivet lines.
While that's going on, I reassembled a few pieces to revisit the cowl.

The firewall ring needs a little more sanding on the lower half to smoothly transition to the fuselage.

The cowl is just hanging here as I need to lower the top point by about 1/4". (as shown it's a little low)
But I'm more concerned with the flaps themselves and how I have the hinges installed. The hinge line seems to be set much lower than the top surface of the cowl, making the flaps bind when opening.
I will get the mounting points all set and then make a layup to recut the flaps and change the hinge setup.
While that's going on, I reassembled a few pieces to revisit the cowl.
The firewall ring needs a little more sanding on the lower half to smoothly transition to the fuselage.
The cowl is just hanging here as I need to lower the top point by about 1/4". (as shown it's a little low)
But I'm more concerned with the flaps themselves and how I have the hinges installed. The hinge line seems to be set much lower than the top surface of the cowl, making the flaps bind when opening.
I will get the mounting points all set and then make a layup to recut the flaps and change the hinge setup.
07-07-2021, 09:14 AM
#90
Thread Starter
Join Date: Sep 2014
Location: Scottsdale, AZ
Posts: 169
Likes: 0
Received 0 Likes
on
0 Posts
Here is a picture of the center flap section primed in white

The moving flap will be painted red someday.
Back to the cowl -


This is with the cowl mounted - the shaft is centered.

Hard to see here, but the engine just barely makes it out.

Same thing from the other side.
It dawned on me that I did not have the right fit here at all. First, I noticed that only about 1/4" of the end shaft of the engine actually cleared the cowl.
Checking the plans, the engine shown is not the GT-80, and the cowl length is significantly different from where my cowl is right now - almost 1/2" shorter.
But then I realized that I don't have this cowl close enough to the firewall - moved back. I'm finding that the firewall ring needs more work (material removed). The removable firewall (in dark gray) is hanging lower than the actual fuselage. The curve or rounding of the firewall ring also needs to be improved so that the cowl can fit back further - particularly around the top gun troughs.
I took a look back at the modeling work by Witold Jaworski (a gold mine of info) and some scale pictures and it's kind of confusing. I see some pictures that show the cowl seamlessly connecting to the fuselage on the top. And then I see others where there is a gap. Keep in mind that there seems to be some difference between the -3 and -5.
So I still have some research to complete - I'm also looking at the builds by bpotter and boB on RCSB.
The moving flap will be painted red someday.
Back to the cowl -
This is with the cowl mounted - the shaft is centered.
Hard to see here, but the engine just barely makes it out.
Same thing from the other side.
It dawned on me that I did not have the right fit here at all. First, I noticed that only about 1/4" of the end shaft of the engine actually cleared the cowl.
Checking the plans, the engine shown is not the GT-80, and the cowl length is significantly different from where my cowl is right now - almost 1/2" shorter.
But then I realized that I don't have this cowl close enough to the firewall - moved back. I'm finding that the firewall ring needs more work (material removed). The removable firewall (in dark gray) is hanging lower than the actual fuselage. The curve or rounding of the firewall ring also needs to be improved so that the cowl can fit back further - particularly around the top gun troughs.
I took a look back at the modeling work by Witold Jaworski (a gold mine of info) and some scale pictures and it's kind of confusing. I see some pictures that show the cowl seamlessly connecting to the fuselage on the top. And then I see others where there is a gap. Keep in mind that there seems to be some difference between the -3 and -5.
So I still have some research to complete - I'm also looking at the builds by bpotter and boB on RCSB.
07-08-2021, 08:15 AM
#91
Thread Starter
Join Date: Sep 2014
Location: Scottsdale, AZ
Posts: 169
Likes: 0
Received 0 Likes
on
0 Posts
I started with a sander, then went to the dremel and finally pulled out a wood file. After the dust settled, I think the firewall ring is getting close to the scale shape.

A whole bunch of material on the firewall ring needed to be removed.

You can see the firewall ring inside the cowl. Now the cowl is about 2/3 past the face of the ring.

Removing balsa and contouring the ring provides this gap between the cowl and the ring.
I didn't measure it yet, but I'd estimate the cowl has been moved back about 1/2".
A whole bunch of material on the firewall ring needed to be removed.
You can see the firewall ring inside the cowl. Now the cowl is about 2/3 past the face of the ring.
Removing balsa and contouring the ring provides this gap between the cowl and the ring.
I didn't measure it yet, but I'd estimate the cowl has been moved back about 1/2".
07-08-2021, 08:21 AM
#92
Thread Starter
Join Date: Sep 2014
Location: Scottsdale, AZ
Posts: 169
Likes: 0
Received 0 Likes
on
0 Posts
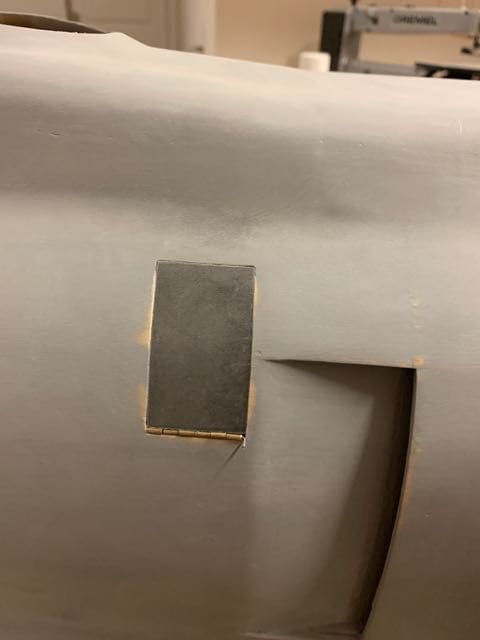
Before I set the new mount locations for the cowl, I needed to get the engine back in place to make sure the shaft was centered.

I'm satisfied with this clearance.
The face of the firewall is right behind the blue material on the ring - so the cowl is seated much closer to the firewall than it appears.

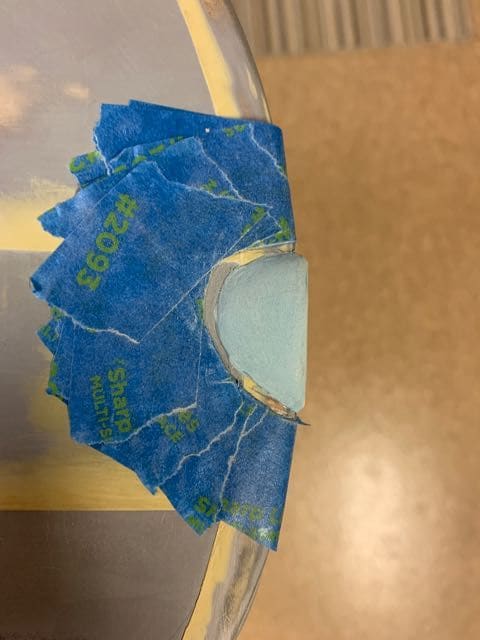
I added packaging tape over the current cowl flaps to support the layups.
As I was adding the screws for the cowl, it occurred to me that my access will change when I add the webbing between the cowl flaps. As of the moment, I'm able to slide my screwdriver between the flaps to drive those screws in place. I've got to think about how I will get to those screws when the cowl/flaps are all in place. Maybe as simple as a hole in the webbing (with the flaps open as far as they will go) and use socket screws so the hole is a little smaller.
I'm satisfied with this clearance.
The face of the firewall is right behind the blue material on the ring - so the cowl is seated much closer to the firewall than it appears.
I added packaging tape over the current cowl flaps to support the layups.
As I was adding the screws for the cowl, it occurred to me that my access will change when I add the webbing between the cowl flaps. As of the moment, I'm able to slide my screwdriver between the flaps to drive those screws in place. I've got to think about how I will get to those screws when the cowl/flaps are all in place. Maybe as simple as a hole in the webbing (with the flaps open as far as they will go) and use socket screws so the hole is a little smaller.
Last edited by BatteryBob; 07-08-2021 at 08:23 AM.
07-14-2021, 01:03 PM
#93
Thread Starter
Join Date: Sep 2014
Location: Scottsdale, AZ
Posts: 169
Likes: 0
Received 0 Likes
on
0 Posts
Still plugging away. Mostly time consuming stuff and not getting long stretches of time.
Made some layups for replacing the current cowl flaps. I plan to change the front end hinge using G10, which I have on order.

I would like the cowl flaps to extend back a bit further.

The flaps were made using 2 layers of 6oz CF cloth between 6 layers of 3oz FG.
Meanwhile, all of the wing sections and been sanded up through 400grit. Working now on the center section.

Using my Bert Kinzey book to check shapes and positioning.

I followed the methods shared by boB and bpotter for making the tanks. Also plan to using packing tape and a layer of Easycoat to help with the wing contour.

I'm not planning to have a bomb release, but I do plan to detail out the bomb rack section.
Made some layups for replacing the current cowl flaps. I plan to change the front end hinge using G10, which I have on order.
I would like the cowl flaps to extend back a bit further.
The flaps were made using 2 layers of 6oz CF cloth between 6 layers of 3oz FG.
Meanwhile, all of the wing sections and been sanded up through 400grit. Working now on the center section.
Using my Bert Kinzey book to check shapes and positioning.
I followed the methods shared by boB and bpotter for making the tanks. Also plan to using packing tape and a layer of Easycoat to help with the wing contour.
I'm not planning to have a bomb release, but I do plan to detail out the bomb rack section.
07-17-2021, 09:39 AM
#94
Thread Starter
Join Date: Sep 2014
Location: Scottsdale, AZ
Posts: 169
Likes: 0
Received 0 Likes
on
0 Posts
After applying a layer of Easycoat to the LE and TE of covers, you have to apply pressure in the center to make sure the Easycoat stays under the tips. I still needed to come back and do a little touch up. The parts need a little push to release from the packing tape.

The fit is real decent.

I labeled each part but they are easily interchangeable given the wing profile is the same across the center section.
Working on the panel lines. I used a couple of different books to find the best layout vs. what I've seen in other builds.

I wanted the entire wing together to make sure the panel lines were aligned from section to section.

The flap hatch is going to be in the path of a panel line.

All the hatches needed a little more work to make them properly recessed into the wing.
The fit is real decent.
I labeled each part but they are easily interchangeable given the wing profile is the same across the center section.
Working on the panel lines. I used a couple of different books to find the best layout vs. what I've seen in other builds.
I wanted the entire wing together to make sure the panel lines were aligned from section to section.
The flap hatch is going to be in the path of a panel line.
All the hatches needed a little more work to make them properly recessed into the wing.
07-21-2021, 09:44 AM
#95
Thread Starter
Join Date: Sep 2014
Location: Scottsdale, AZ
Posts: 169
Likes: 0
Received 0 Likes
on
0 Posts
Finally starting on some panel lines. Again, following bpotter and boB over on RCSB.
I'm using the Douglas SBD Dauntless book by Mariusz Łukasik for panel line reference. It's not challenging scaling off of 1:48 prints, but it could be a source of error. I'm working in mm.

The book in question
I also noticed, as bpotter referenced, the top side mail box/windows are should be about the same size, top vs. bottom based on my references. So that would make the top windows too large. I doubt that I'll do anything about that. I'm not sure what other scale issues exist on the Ziroli version, so why worry about this one is my thought.
Back to the panel lines - I'm also using the yellow icing. My first experience with it and it seems very similar to Easycoat.

I used 4 layers like boB recommends. It takes some practice regarding sanding while the icing sets up.

boB provides a nice step by step for how he builds the panels. I used a small detail sander to rough in the icing, followed by medium and fine sanding (sponge) blocks.
I'm using the Douglas SBD Dauntless book by Mariusz Łukasik for panel line reference. It's not challenging scaling off of 1:48 prints, but it could be a source of error. I'm working in mm.
The book in question
I also noticed, as bpotter referenced, the top side mail box/windows are should be about the same size, top vs. bottom based on my references. So that would make the top windows too large. I doubt that I'll do anything about that. I'm not sure what other scale issues exist on the Ziroli version, so why worry about this one is my thought.
Back to the panel lines - I'm also using the yellow icing. My first experience with it and it seems very similar to Easycoat.
I used 4 layers like boB recommends. It takes some practice regarding sanding while the icing sets up.
boB provides a nice step by step for how he builds the panels. I used a small detail sander to rough in the icing, followed by medium and fine sanding (sponge) blocks.
07-21-2021, 09:53 AM
#96
Thread Starter
Join Date: Sep 2014
Location: Scottsdale, AZ
Posts: 169
Likes: 0
Received 0 Likes
on
0 Posts
Just a little more. I finally took my turn at making a small silicone mold. I used the same system that others are using. I have various size phillips screws that I will cast.

The panel lines on the bottom of the wings are done now. I did find a few places where the tape lifted off weak fiberglass areas I missed. It was only in a couple places, and maybe 1/4" or smaller. I should probably switch to a lower tack tape.
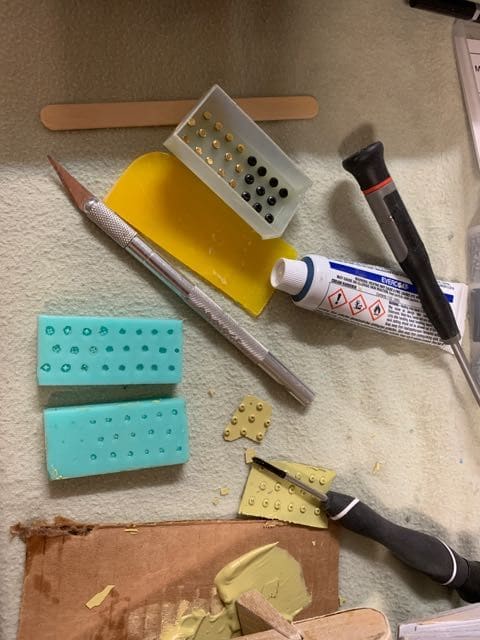
I made a couple molds with phillips heads and hex heads (for the rollover tower).
I agree with boB that the icing works well for making the parts. Just need to work in the icing real well (over and over) to get the parts fully filled. The connecting film breaks off easy. From there, I sand the backs a little to get the right thickness.
I'll make a bunch of these and keep them in my assortment box. I'm surprised someone is making these in bulk and selling. Must be the $ vs. hassle.
The panel lines on the bottom of the wings are done now. I did find a few places where the tape lifted off weak fiberglass areas I missed. It was only in a couple places, and maybe 1/4" or smaller. I should probably switch to a lower tack tape.
I made a couple molds with phillips heads and hex heads (for the rollover tower).
I agree with boB that the icing works well for making the parts. Just need to work in the icing real well (over and over) to get the parts fully filled. The connecting film breaks off easy. From there, I sand the backs a little to get the right thickness.
I'll make a bunch of these and keep them in my assortment box. I'm surprised someone is making these in bulk and selling. Must be the $ vs. hassle.
07-29-2021, 01:01 PM
#97
Thread Starter
Join Date: Sep 2014
Location: Scottsdale, AZ
Posts: 169
Likes: 0
Received 0 Likes
on
0 Posts
The bottom wing panel lines are finished for the most part. There is more detailing around the center bomb rack area and the tanks will need to be added - I'm not doing that until I'm well past all the handling of the wing to avoid dings.

A few coats of primer were put on the top and it was time to feel around for surface issues

This plane gets big when you put the parts together.

Used a long sanding bar with 220 and 320 grit to reveal low spots. Easycoat was used in just a few locations along with the 3M spot putty.
I got my book out and started measuring a adding the panel lines while also paying attention to the panel lines in place on the bottom.
There are a few spots where I would like to improve the transition from the center to outer panels.
A few coats of primer were put on the top and it was time to feel around for surface issues
This plane gets big when you put the parts together.
Used a long sanding bar with 220 and 320 grit to reveal low spots. Easycoat was used in just a few locations along with the 3M spot putty.
I got my book out and started measuring a adding the panel lines while also paying attention to the panel lines in place on the bottom.
There are a few spots where I would like to improve the transition from the center to outer panels.
07-29-2021, 01:05 PM
#98
Thread Starter
Join Date: Sep 2014
Location: Scottsdale, AZ
Posts: 169
Likes: 0
Received 0 Likes
on
0 Posts
Went back and made a new part for the windshield frame. This is just made up of 3 layer 3oz crowsfoot FG cloth.
The main difference was, instead of using Saran wrap (a big mistake), I used a combination of car wax and mold release. A few coats of both.

Nothing fancy with the wax or mold release. Same mold release I use for silicone molding.

I used a new canopy with the front still in place. I put multiple coats of wax and then 2-3 spray coats. The part released fairly easy - I bit of suction and you need to take care to not damage the vacuum molded part.
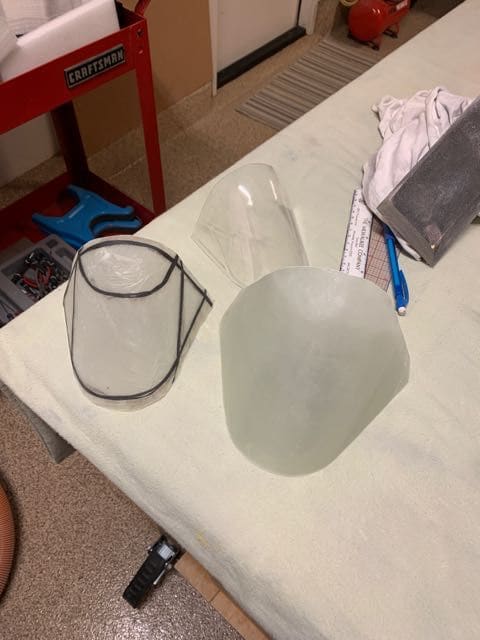
The inner surface is much smoother with the wax/release vs. saran wrap (on the left - no plans to use this part).
The main difference was, instead of using Saran wrap (a big mistake), I used a combination of car wax and mold release. A few coats of both.
Nothing fancy with the wax or mold release. Same mold release I use for silicone molding.
I used a new canopy with the front still in place. I put multiple coats of wax and then 2-3 spray coats. The part released fairly easy - I bit of suction and you need to take care to not damage the vacuum molded part.
The inner surface is much smoother with the wax/release vs. saran wrap (on the left - no plans to use this part).
08-06-2021, 09:26 AM
#99
Thread Starter
Join Date: Sep 2014
Location: Scottsdale, AZ
Posts: 169
Likes: 0
Received 0 Likes
on
0 Posts
I'm trying to make the canopy frame layups while working on the icing steps on the wings.

This is the 3rd section. I'm finding the this and the layup prior to not be fully cured. I've seen some guys mention baking these to harden them up. Something I've never done.

I added icing to improve the blend of the joint to the center section.
Getting closer to having the wings ready for rivets. The following are similar to boB's build on RCSB. But if you aren't on that website, here are my steps for adding panel lines to the wings.

The center section is fairly straight forward. I still have to add a few narrow sections that run along the outer wing joint.

After starting in the corner, the process moves up.

And inner panels, moving to outer panels.

This is the 3rd section. I'm finding the this and the layup prior to not be fully cured. I've seen some guys mention baking these to harden them up. Something I've never done.
I added icing to improve the blend of the joint to the center section.
Getting closer to having the wings ready for rivets. The following are similar to boB's build on RCSB. But if you aren't on that website, here are my steps for adding panel lines to the wings.
The center section is fairly straight forward. I still have to add a few narrow sections that run along the outer wing joint.
After starting in the corner, the process moves up.
And inner panels, moving to outer panels.
08-06-2021, 09:36 AM
#100
Thread Starter
Join Date: Sep 2014
Location: Scottsdale, AZ
Posts: 169
Likes: 0
Received 0 Likes
on
0 Posts
Just a few more parts to add, one of which is the wingtip lights.
I used polystyrene and cut a piece in the shape of the profile when looking from the tip to the root. I spot glued this in place using CA and then filled behind it to shape using Superfil.

I layered tape to the profile of the light housing based on my reference books.

The tape also prevent the Superfil from going in the wrong place. After going back to the scale pictures, I realized my initial amount of Superfil wasn't enough.

Since the Superfil takes hours to cure, it was easy to add more to get a decent shape. I really like working with this stuff. It's light and strong.
Not much sanding was required. Just enough to all the icing to attach and create the panel line set by the tape.

I still need to complete the bottom side and other wingtip, but this looks good to me. Of course, the actual light and housing still needs to be made and attached.
I used polystyrene and cut a piece in the shape of the profile when looking from the tip to the root. I spot glued this in place using CA and then filled behind it to shape using Superfil.
I layered tape to the profile of the light housing based on my reference books.
The tape also prevent the Superfil from going in the wrong place. After going back to the scale pictures, I realized my initial amount of Superfil wasn't enough.
Since the Superfil takes hours to cure, it was easy to add more to get a decent shape. I really like working with this stuff. It's light and strong.
Not much sanding was required. Just enough to all the icing to attach and create the panel line set by the tape.
I still need to complete the bottom side and other wingtip, but this looks good to me. Of course, the actual light and housing still needs to be made and attached.