


Glenn Torrence (GTM) 1/3 Scale Dr.1 Build Along
 06-16-2006, 10:40 PM
#1
Senior Member
Thread Starter
My Feedback: (4)

Join Date: Oct 2003
Location: Hamilton,
OH
Posts: 1,141
Likes: 0
Received 0 Likes
on
0 Posts
First let me explain why my mug is on the site for Glenn's upcoming 1/3 scale Dr.1.
Glenn has a lot of projects going and not enough time to get all done that he wants, so he asked me if I would be interested in helping out on his next project, the 1/3 scale Dr.1. Needless to say it took me all of about .50 nano seconds to say Yes.
What we will be doing is, as he designs and cuts the parts, I will be putting them together and posting on this building thread.
As I have posted pictures and comments occasionally, I have not done a building thread before, so bear with me and I'm sure I'll get better as time goes on.
Any comments and suggestions are certainly welcome.
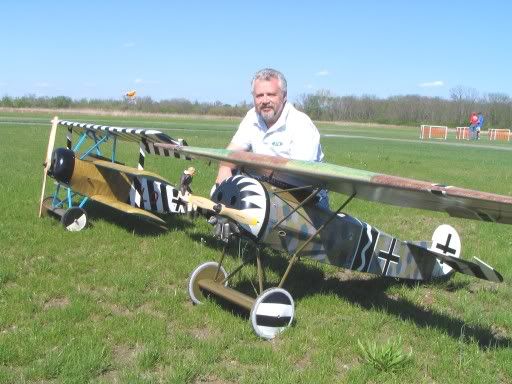
As seen here, my last two projects are: Glenn's low cost EV/DVIII, kicked up a notch and BUSA's Dr.1 with a few added goodies.
Looking forward to having a lot of fun with this project and building a nice airplane as it is being designed.
MORE to come soon.
Del
Glenn has a lot of projects going and not enough time to get all done that he wants, so he asked me if I would be interested in helping out on his next project, the 1/3 scale Dr.1. Needless to say it took me all of about .50 nano seconds to say Yes.
What we will be doing is, as he designs and cuts the parts, I will be putting them together and posting on this building thread.
As I have posted pictures and comments occasionally, I have not done a building thread before, so bear with me and I'm sure I'll get better as time goes on.
Any comments and suggestions are certainly welcome.
As seen here, my last two projects are: Glenn's low cost EV/DVIII, kicked up a notch and BUSA's Dr.1 with a few added goodies.
Looking forward to having a lot of fun with this project and building a nice airplane as it is being designed.
MORE to come soon.
Del
 06-17-2006, 09:41 AM
#2
Senior Member
Thread Starter
My Feedback: (4)
Join Date: Oct 2003
Location: Hamilton,
OH
Posts: 1,141
Likes: 0
Received 0 Likes
on
0 Posts
Ok, since the complete kit doesn't exist yet, I will be building as Glenn sends things to me. At this point I have the parts for all the tail feathers, the scale hinges, control horns for the tail, the seat and the sub-wing. What I'll start with is the control horns.
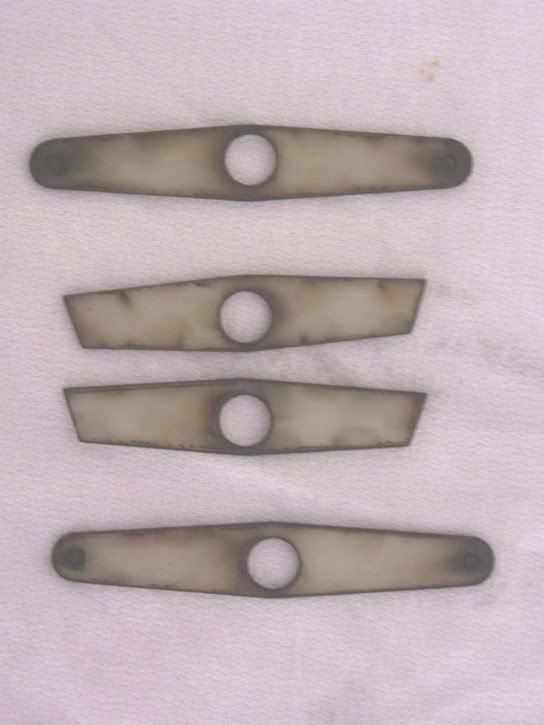
These are the parts for a horn, the material is G-10 or FR-4, you have two inner pieces and to outer. As you can tell they are laser cut, so I used 250 grit sand paper to get the char off and rough up the surface. This is the first time that I have used this material and found it quite easy to work with and strong.
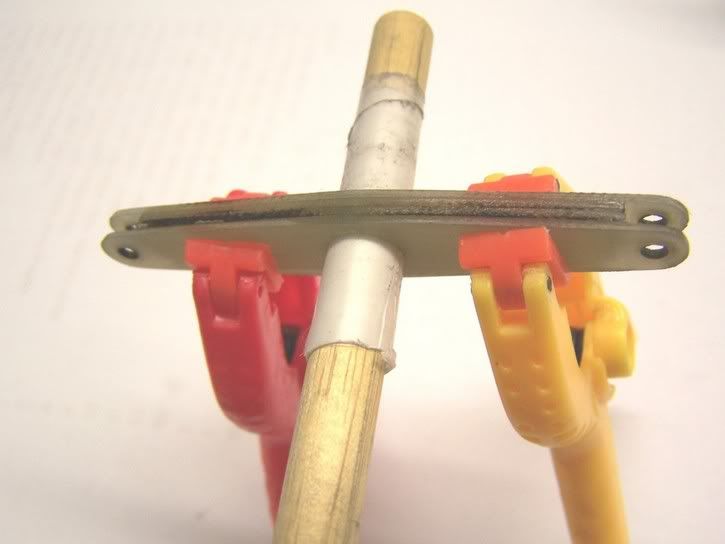
I next took a dowel, wraped some wax paper around it and lightly clamped it after making sure everything was lined up. Oh yes, you will notice that the large hole is offset a little so care must be taken to make sure of proper alignment. This offset is for adjusting for the thickness of the hinge material. The thinner side goes forward. I then used thin CA and let it wick between all layers. This is the way I did it, you may have a diferent method.......whatever works best for you.
These are the parts for a horn, the material is G-10 or FR-4, you have two inner pieces and to outer. As you can tell they are laser cut, so I used 250 grit sand paper to get the char off and rough up the surface. This is the first time that I have used this material and found it quite easy to work with and strong.
I next took a dowel, wraped some wax paper around it and lightly clamped it after making sure everything was lined up. Oh yes, you will notice that the large hole is offset a little so care must be taken to make sure of proper alignment. This offset is for adjusting for the thickness of the hinge material. The thinner side goes forward. I then used thin CA and let it wick between all layers. This is the way I did it, you may have a diferent method.......whatever works best for you.
06-17-2006, 09:53 AM
#3
Senior Member
Thread Starter
My Feedback: (4)
Join Date: Oct 2003
Location: Hamilton,
OH
Posts: 1,141
Likes: 0
Received 0 Likes
on
0 Posts
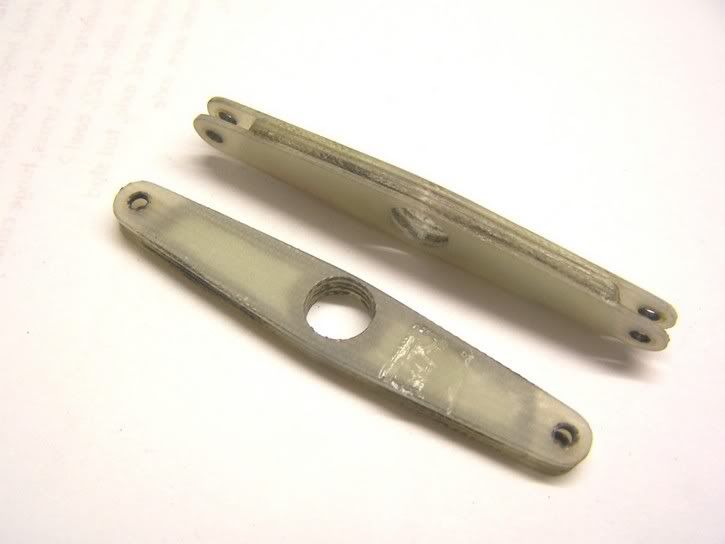
Once glued then you can sand to an airfoil shape. Be careful not to go too far out so as not to weaken the tabs on the end. You can make them look like they were welded on like the real ones if you like.
For shaping I used a coarse file and sand paper. While it didn't really take that long to do three of them, I can see where a 1" belt sander would really shine.........Gotta get me one of those.
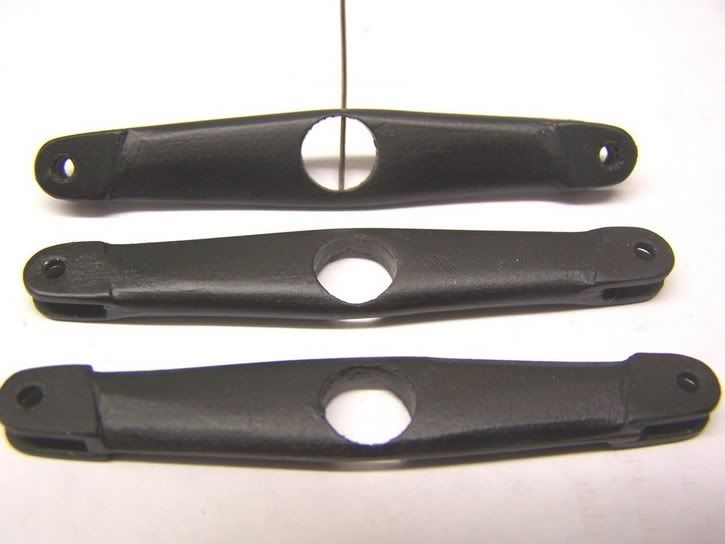
Here they are finish, well almost. When you paint them the little file and sand marks really show up, so will go back over them with finer paper and repaint.
That takes care of the easy part, will probably do the rudder next.
Later
Del
06-17-2006, 04:33 PM
#5
Senior Member
Thread Starter
My Feedback: (4)
Join Date: Oct 2003
Location: Hamilton,
OH
Posts: 1,141
Likes: 0
Received 0 Likes
on
0 Posts

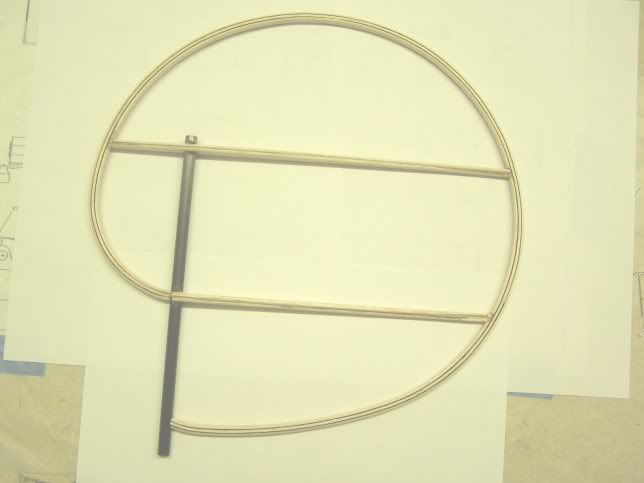
Here you see all the parts to make the rudder. You have the three balsa and two ply strips that you laminate to get the rudders outer shape. They are soaked and glued (I use Titebond) around the cardboard pattern.
The two ribs get laminated from two balsa and one ply each. Then you have the carbon fiber rudder post.
The twelve inch scale gives an idea of the rudders size.
Del
06-17-2006, 04:36 PM
#6

Join Date: May 2003
Location: Boise,
ID
Posts: 888
Likes: 0
Received 0 Likes
on
0 Posts
Hey Del,
Those look great, I like the design...just slip the cable loop in and pin and it's attached. That G-10/FR-4 is very useful stuff to have around. This is going to be a very interesting build....I've been mulling over my next project and Glenn's 1/4 scale DR-1 is on the short list....we'll see.
Randy
Those look great, I like the design...just slip the cable loop in and pin and it's attached. That G-10/FR-4 is very useful stuff to have around. This is going to be a very interesting build....I've been mulling over my next project and Glenn's 1/4 scale DR-1 is on the short list....we'll see.
Randy
06-17-2006, 08:52 PM
#7

My dear von Delby . . .
First off, Congratulations on taking on this most noble of projects!
I am Definitely looking forward as well to this thread (and not because I get to see this thing in person or touch the control sticks or anything like that!!) - - - this is the kit that the R/C WWI enthusiasts have been waiting for all these years IMHO!!!
It will also be a nice change of pace to have a machine that isn’t sooooo far out there vis-�*-vis what the experts think as to how it’s painted – ‘cause I know you’re not doing F1 103/17 or Dr.1 425/17. In fact, that’s gonna be one of the fun things about this project, getting different opinions on how to paint it!!! I know you’ve got the Fokker Olive Green Streaking thing down pat – now it’s just what other paints to put on it!!!
We’ll have to keep the folks over at the ‘drome up to speed on this one (but I somehow suspect that will be no problem).
One request – sometime in the next few posts have your lovely missus hold her hand in the photo of the rudder, to give us a really good idea of scale – I’m still messed up on that metric thingie the schools were trying to foist off on us way back when, and can’t really get my mind around comparing a yardstick / meter stick / ruler to anything real!!!
Again, congrats, and keep the posts coming.
Best regards,
Lee McDuffee
the WinterHawke
Bye the bye – Randy, I REALLY loved the build thread on the Hanriot – most informative, and I have to thank you MOST sincerely for the note on Super phatic Glue – I have been unable to use CA glues for forever, and this is the next best thing I’ve ever used (without the associated CA health problems) -- many, many thanks!!! Very best of luck on future competitions with the Hanriot – I’m looking forward to reading about your successes in the modeling press!!!
06-18-2006, 10:06 AM
#8
Senior Member
My Feedback: (3)

Join Date: Aug 2002
Location: Comox,
BC, CANADA
Posts: 274
Likes: 0
Received 0 Likes
on
0 Posts
Should be a real beauty. When the control horns are already impressive, you know that only good things will follow! Any idea of what you will be using for power, and what the wing area will be?
06-18-2006, 01:25 PM
#9
Senior Member
Thread Starter
My Feedback: (4)
Join Date: Oct 2003
Location: Hamilton,
OH
Posts: 1,141
Likes: 0
Received 0 Likes
on
0 Posts
Howdy Randy, yep the horns are really neat, they work just like the big boys. Good luck with your first show.
Lee....unlike the EV, there's a lot of schemes to pick from........decisions-decisions
vonJaerschky......already have the engine,a Roto 70 Twin, should have more than enough power and will probably need the weight, 5.7 lbs. I think Glenn estimated the finished weight at between 30 and 35 lbs.
This will be my first experience with a gas engine, always had 4 stroke glow.
He hasn't gotten to the wings yet, probably somewhere around 100" for the topwing.
Later
Del
06-18-2006, 01:34 PM
#10
Senior Member
Thread Starter
My Feedback: (4)
Join Date: Oct 2003
Location: Hamilton,
OH
Posts: 1,141
Likes: 0
Received 0 Likes
on
0 Posts
Here's the two rudder ribs after glued.

Using the provided cardboard pattern, (two pieces taped together) The laminateing went rather quickly. I put a cuple inches of hot water in the bath tub and let soak for about 15 minutes. I used Titebond for the glue.
I pinned blocks all around the rudder and let dry over night.

Del
Using the provided cardboard pattern, (two pieces taped together) The laminateing went rather quickly. I put a cuple inches of hot water in the bath tub and let soak for about 15 minutes. I used Titebond for the glue.
I pinned blocks all around the rudder and let dry over night.
Del
06-18-2006, 07:14 PM
#11
Senior Member
Thread Starter
My Feedback: (4)
Join Date: Oct 2003
Location: Hamilton,
OH
Posts: 1,141
Likes: 0
Received 0 Likes
on
0 Posts
Here's the rudder with the ribs and post tacked in place. need to do more sanding to get the proper size radius.
Also did not glue the bottom of the post as a hinge and control horn need to be located and then another hinge at the bottom of the post.
Hopefully I'll get the lighting better for the photo's.
Next thing is to make the hinges with material provided.
Del
Also did not glue the bottom of the post as a hinge and control horn need to be located and then another hinge at the bottom of the post.
Hopefully I'll get the lighting better for the photo's.
Next thing is to make the hinges with material provided.
Del
06-18-2006, 07:33 PM
#12
Join Date: May 2003
Location: Boise,
ID
Posts: 888
Likes: 0
Received 0 Likes
on
0 Posts
Del,
Looks great already....I'm having builders withdrawal symptoms so maybe this will help me through!!!
You really ought to look at a 1" belt sander with the 5" disk.....I went for years doing everything by hand and then half way through my Strutter project about four years ago I bought a little Micro-Mark drill press and a Delta belt sander......Can't live without them now!!
And Lee, I'm pleased the Super Phatic worked for you. it is great stuff...I simply passed the info along...I read about it on someone's thread either here or over at RCSB..can't remember just where now....
Randy
06-18-2006, 07:41 PM
#13
Senior Member
Thread Starter
My Feedback: (4)
Join Date: Oct 2003
Location: Hamilton,
OH
Posts: 1,141
Likes: 0
Received 0 Likes
on
0 Posts
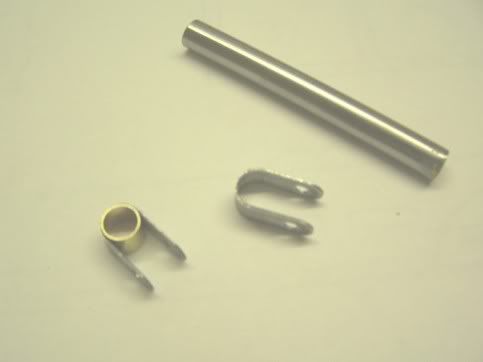
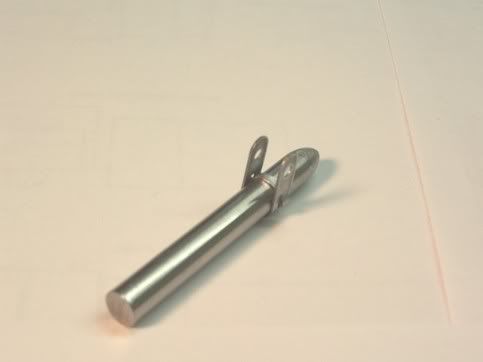
Here are the parts for one hinge, soft steel strap that needs to be bent in a U shape (laser cut), a 11/32 brass bushing that will go inside the strap and a locking color for each side. They will be pinned through the post.
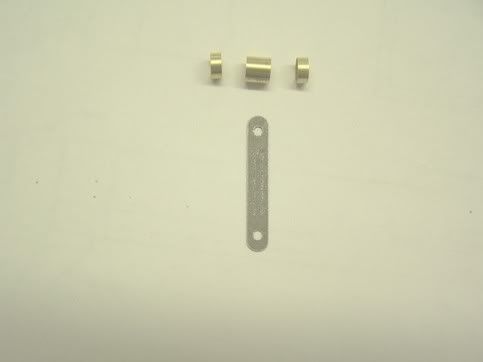
Next you see the strap clamped to a 11/32 steel dowel. Make sure you have it centered and just use your thumb to roll the strap around the dowel. It forms very easy.
Del
Next you see the strap clamped to a 11/32 steel dowel. Make sure you have it centered and just use your thumb to roll the strap around the dowel. It forms very easy.
Del
06-18-2006, 07:52 PM
#14
Senior Member
Thread Starter
My Feedback: (4)
Join Date: Oct 2003
Location: Hamilton,
OH
Posts: 1,141
Likes: 0
Received 0 Likes
on
0 Posts
Even'n Randy..........Yep, I'm going to get one of those sanders, there's been several time that one would have came in handy.
Lee was down from Mich. this weekend, we got a couple good flights on the Dr.1, extremely windy but it handled it pretty good.
Del
Lee was down from Mich. this weekend, we got a couple good flights on the Dr.1, extremely windy but it handled it pretty good.
Del
06-18-2006, 08:00 PM
#15
Senior Member
Thread Starter
My Feedback: (4)
Join Date: Oct 2003
Location: Hamilton,
OH
Posts: 1,141
Likes: 0
Received 0 Likes
on
0 Posts
Here's a couple of straps bent, you can see how the brass bushing fits in it nicely. I also tapered one end of the steel dowel a little to help shape the rebend later.
Del
Del
06-18-2006, 08:24 PM
#16
Senior Member
Thread Starter
My Feedback: (4)
Join Date: Oct 2003
Location: Hamilton,
OH
Posts: 1,141
Likes: 0
Received 0 Likes
on
0 Posts
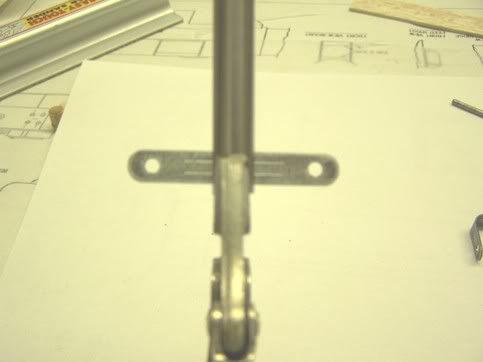
Glenn provides a piece of 1/4 ply with a notch on one end. You can glue a piece of 5/16 dowel on each side of the notch.
I used an old screwdriver, ground a radius on the end and that's what I used to tap the rebend strap down. After that I used the steel dowel that I tapered a little on one end to tap down through to make the correct size for the brass bushing.
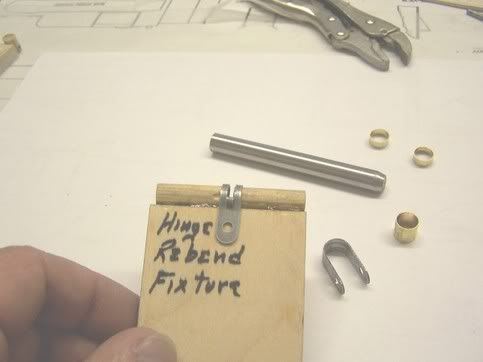
And here we have a finished hinge. You can eather CA or solder the bushing in the strap.
Only ten more to go.
Del
I used an old screwdriver, ground a radius on the end and that's what I used to tap the rebend strap down. After that I used the steel dowel that I tapered a little on one end to tap down through to make the correct size for the brass bushing.
And here we have a finished hinge. You can eather CA or solder the bushing in the strap.
Only ten more to go.
Del
06-19-2006, 07:29 PM
#17
Senior Member
Thread Starter
My Feedback: (4)
Join Date: Oct 2003
Location: Hamilton,
OH
Posts: 1,141
Likes: 0
Received 0 Likes
on
0 Posts
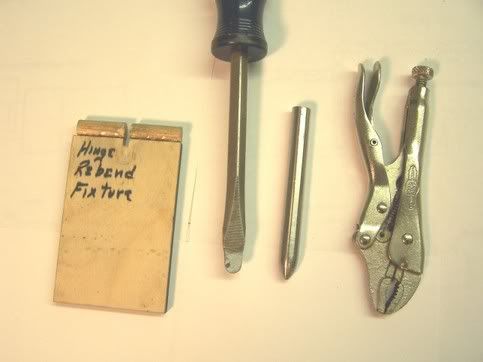
I got a couple emails asking for a little more info on the hinges. It is really a lot easier than one might think. Once I did the first one to figure out how I wanted to do it, I knocked out the rest of them in about an hour.
The tools are very simple, nothing really special, just mostly things that Joe modeler would have around the average building shop.
First the ply rebend fixture, all you do is glue the 5/16 wood dowel on each side of the slot. I did have to sand the slot width out a little. I used an old Craftman 1/4 screwdriver, ground a radius on the end that closely matches the brass bushing radius. It just has to be close, the 11/32 steel dowel will give it it's finished size and shape. I also ground a little more taper on the steel dowel to make tapping it through the hinge easier. A small visegrip to hold the strap while forming it around the dowel.
The only other tools I used was a vise to hold the fixture and a small hammer.
06-19-2006, 07:40 PM
#18
Senior Member
Thread Starter
My Feedback: (4)
Join Date: Oct 2003
Location: Hamilton,
OH
Posts: 1,141
Likes: 0
Received 0 Likes
on
0 Posts
Here is the strap on the fixture (not shown is a clamp holding the bottom of the strap), and useing the screwdriver just tap the center strap down, (the hinge comes off easy so you can see how much further down you need to go. You do not want to tap with the hammer too hard as the strap might bend off center some.

Here you see the dowel tapped through the hinge to size and shape it correctly.
Here you see the dowel tapped through the hinge to size and shape it correctly.
06-19-2006, 07:45 PM
#19
Senior Member
Thread Starter
My Feedback: (4)
Join Date: Oct 2003
Location: Hamilton,
OH
Posts: 1,141
Likes: 0
Received 0 Likes
on
0 Posts
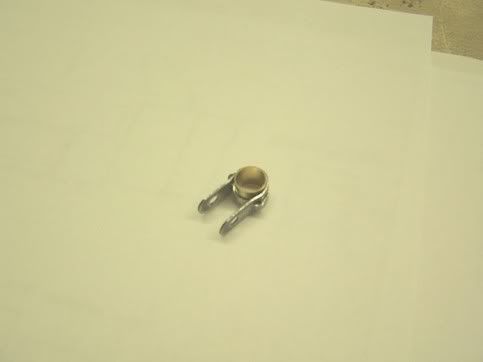
You can see here how nice the dowel sizes the hole, the bushing fits in very nicely.

Here's the rest of the hinges.
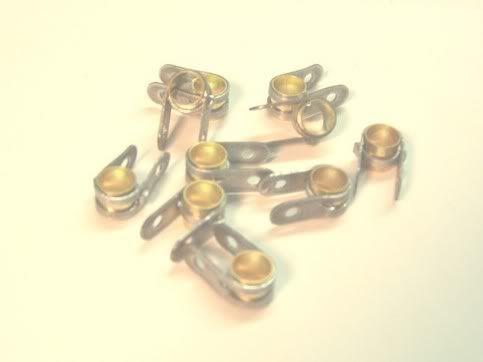
Here's the rest of the hinges.
06-19-2006, 07:55 PM
#20
Senior Member
Thread Starter
My Feedback: (4)
Join Date: Oct 2003
Location: Hamilton,
OH
Posts: 1,141
Likes: 0
Received 0 Likes
on
0 Posts
After I finished the hinges I decided to solder the bushings to the straps. I did four of them, then checked to see how they fit on the carbon fiber shaft. A couple of them evidently warped a little from the heat as they did not slide easy, so I will probably CA the rest of them to avoid that happening again.
Next back to work on the rudder now that I can locate the hinges and control horn.
Later
Del
Next back to work on the rudder now that I can locate the hinges and control horn.
Later
Del
06-20-2006, 09:03 AM
#21
My dear von Delby,
Great catching up with you this weekend, and seeing the first pieces of this project up close and personnal-like.
The control horns and hinges look really good – I was especially impressed with how very light the horns are – wish I’d known about this material when I was doing the hardware on my BUSA Fokker a year ago, would’ve saved bunches of weight.
Looks like Glenn’s nailed the look of both the horns and the hinges – there is a most excellent construction thread over on the Aerodrome by Achim Engels over in Germany
http://www.theaerodrome.com/forum/showthread.php?t=4402
– he’s building several different Fokker replicas, and on page 6 and 7 of this vveeerrrryy long thread he shows the exact parts you’ve built here, and yours look just like his!!!
A thought – mayhaps you’d want to solder the brass to the steel strap while its held in a pin fixture – that would keep everything square, and prevent distortion. Another thought that occurs is wondering if this wouldn’t be a good application for that JB Weld schtuff?
Anyhoo, keep the pictures coming!
Best regards,
Lee McDuffee
the WinterHawke
06-20-2006, 09:05 PM
#22

My Feedback: (2)
Join Date: Oct 2002
Location: YOUNGSVILLE,
NC
Posts: 40
Likes: 0
Received 0 Likes
on
0 Posts
Hey Del - Your not wasting anytime with the parts.  Also, you figured out the hinge pieces making some really nice parts. Your making it look sort-of easy. It took me a wee-bit to figure all that out. Ok, a few beers were involved. I do agree with you that gluing the hinge to the brass is the way to go. To me it's simpler and quicker; plus the steel basically welds to the brass tubing. I guess I better get some more parts up to you keeping this build-along moving. Your parts are looking real good - Glenn
Also, you figured out the hinge pieces making some really nice parts. Your making it look sort-of easy. It took me a wee-bit to figure all that out. Ok, a few beers were involved. I do agree with you that gluing the hinge to the brass is the way to go. To me it's simpler and quicker; plus the steel basically welds to the brass tubing. I guess I better get some more parts up to you keeping this build-along moving. Your parts are looking real good - Glenn
06-21-2006, 05:17 PM
#23
Senior Member
Thread Starter
My Feedback: (4)
Join Date: Oct 2003
Location: Hamilton,
OH
Posts: 1,141
Likes: 0
Received 0 Likes
on
0 Posts
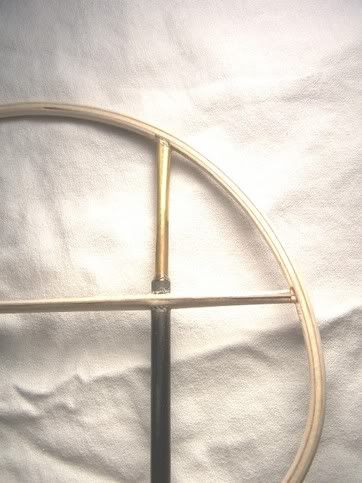
OK, now we'll get back to the rudder. I did some more sanding and shaping so when it's covered it will give the illusion of a steel tubing frame.
Glenn provides a lenght of 7/32 brass tubing which you will slide all the way through the carbon fiber post. Use some pliers and flatten the end some to match the thickness of the frame. I did that about an inch up from the end in a tapering fashion. You then notch the first balsa layer and glue both ends. I used thick CA.
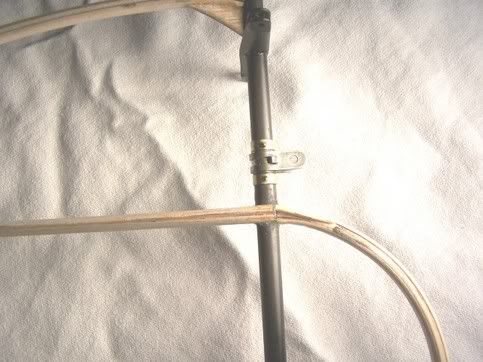
I then layed the rudder back on the plan and marked the location of the hinges and horn on the post. Slide one of the locking collars up to the top mark. I put a small CA tack to hold it in place, with a center punch, very lightly mark the center of the collar and drill a hole all the way through. I used a #55 drill. Then put one of the provided brass brads through the hole, snip off the excess and a small drop of thick CA on each side of the brad. You can now slide on a hinge and another collar, mark, drill and pin it. The hinge is now captured between the collars and will rotate on the rudder post. Make sure the second collar is NOT tight against the hinge so it turns freely.
Next slide the horn on to its location, (remember that the hole is offset, make sure that the thin side is to the front), making very sure that it is square with the post and glue. I tacked it with thin CA then went around the post with thick. You can now glue the bottom of the rudder frame to the post and add the gusset for a little extra strength. You then locate and pin the second hinge in place repeating the same procedure as the first one.
Glenn provides a lenght of 7/32 brass tubing which you will slide all the way through the carbon fiber post. Use some pliers and flatten the end some to match the thickness of the frame. I did that about an inch up from the end in a tapering fashion. You then notch the first balsa layer and glue both ends. I used thick CA.
I then layed the rudder back on the plan and marked the location of the hinges and horn on the post. Slide one of the locking collars up to the top mark. I put a small CA tack to hold it in place, with a center punch, very lightly mark the center of the collar and drill a hole all the way through. I used a #55 drill. Then put one of the provided brass brads through the hole, snip off the excess and a small drop of thick CA on each side of the brad. You can now slide on a hinge and another collar, mark, drill and pin it. The hinge is now captured between the collars and will rotate on the rudder post. Make sure the second collar is NOT tight against the hinge so it turns freely.
Next slide the horn on to its location, (remember that the hole is offset, make sure that the thin side is to the front), making very sure that it is square with the post and glue. I tacked it with thin CA then went around the post with thick. You can now glue the bottom of the rudder frame to the post and add the gusset for a little extra strength. You then locate and pin the second hinge in place repeating the same procedure as the first one.
06-21-2006, 05:21 PM
#24
Senior Member
Thread Starter
My Feedback: (4)
Join Date: Oct 2003
Location: Hamilton,
OH
Posts: 1,141
Likes: 0
Received 0 Likes
on
0 Posts
A couple shots of the finished rudder.
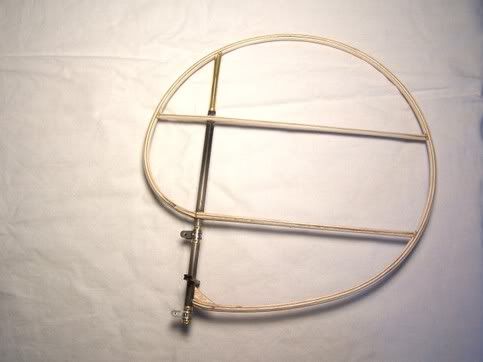
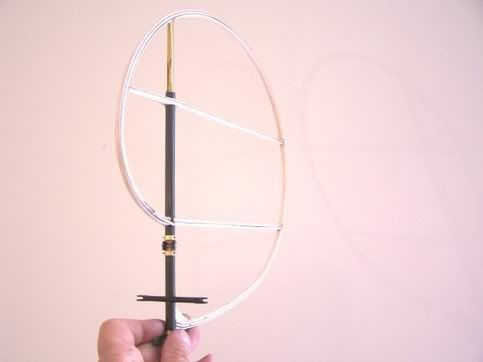
I think I'll start on the elevator next, they are laminated also.
Later
Del
I think I'll start on the elevator next, they are laminated also.
Later
Del
06-21-2006, 07:34 PM
#25
Senior Member
Thread Starter
My Feedback: (4)
Join Date: Oct 2003
Location: Hamilton,
OH
Posts: 1,141
Likes: 0
Received 0 Likes
on
0 Posts
Here's the first half of the elevator. It's laminated the same way as the rudder. I'll let it dry tonight and take it up tomorrow after work, then I'll lay up the other half.
Del
Del