


1/7 Scale Blackburn Buccaneer All Composite Scratch Build
 10-22-2021, 12:25 PM
#676

Thomas,
Luckily it seems that all of the systems survived. At least they look undamaged - I have not powered anything up yet for a functional check though.
I lost the fuel tanks and one exhaust pipe. One engine tailcone has a small dent in it, plus both engine mounts are bent.
Not bad after being dropped from 300ft!
Paul
 10-22-2021, 01:32 PM
#677


Paul,
I am so sorry to hear about your unfortunate crash. It must be immensely disappointing.
You are right about the skin to framework glue. It has not contacted the skin over quite a large area.
Years ago I bought a *camera on a snake for checking internals. I've never really used it, but I will in future, having seen the problems that can lurk unnoticed..
I hope you get over your shock and disappointment and build a third model. After all that effort you deserve to end up with a great model.
(* endoscopic camera)
Last edited by alasdair; 10-23-2021 at 06:21 AM.
10-22-2021, 02:14 PM
#678

Sorry for your loss. Prototyping and testing, is a tough business.
I have built a few Airex sandwich wings, after learning from a very good Slovakian guy. He stressed two things; sanding and priming. Never be happy with the peel ply surface alone, but sand it. Prime the edges of the shear webs, and the contact area of the wing skin, preferably with a low viscosity epoxy. Small gaps, and a good fit, is mandatory, but the primed surfaces will shake hands with your glue bead, even if it barely touches.
I hope you find the inspiration to go on. The aircraft looked so good in the air!
Lars
The following users liked this post:
Ron S (10-22-2021)
10-22-2021, 04:28 PM
#679
My Feedback: (20)
Paul, nothing I can say can take away the gut punch I'm sure you feel after the loss of #2. At least there are some clues for the possible cause. I just want you to know how much you have taught and encouraged us mere mortals seeing you bring this model to life using engineering, inovation and new technology. I hope you will continue. It is an awesome project.
Gary
Gary
10-22-2021, 07:37 PM
#680
I know a lot of people use the Hysol yet the Plexus range of methacrylic's is far superior. Even if your your bonding surface is not 100% it actually eats into the material being bonded, any failures will always be material not the actual bond.
Yes in this case it may not have helped yet the MA 300 and 320 are the way to go.
Only downside is it can leave dimples if your using thin layups.
It is a pity she has gone in, very interesting model choice and great attention to detail.
Regards,
Yes in this case it may not have helped yet the MA 300 and 320 are the way to go.
Only downside is it can leave dimples if your using thin layups.
It is a pity she has gone in, very interesting model choice and great attention to detail.
Regards,
10-23-2021, 01:23 AM
#681
One thing you can do to help with this issue is invest in a cheap endoscopic camera, for 20 bucks or so.
I inspect all new planes this way as I don't trust any ARF company out there. I found ribs glued to just one side in multiple planes from different brands. Went as far as drilling an inspection hole in the tail booms of one of my planes that didn't have any accessible inspections before building it for this very reason. If you find any issue on the ground, you can stick some hysol in there and apply some pressure to fix the issue. Troublesome, but a lot better than inflight failure/flutter
The camera can also help inspecting a plane after it suffers a hard landing or minor crash, or just at the beginning of a season for peace of mind!
The following users liked this post:
Halcyon66 (10-23-2021)
10-28-2021, 04:03 PM
#682
Banned
My Feedback: (788)
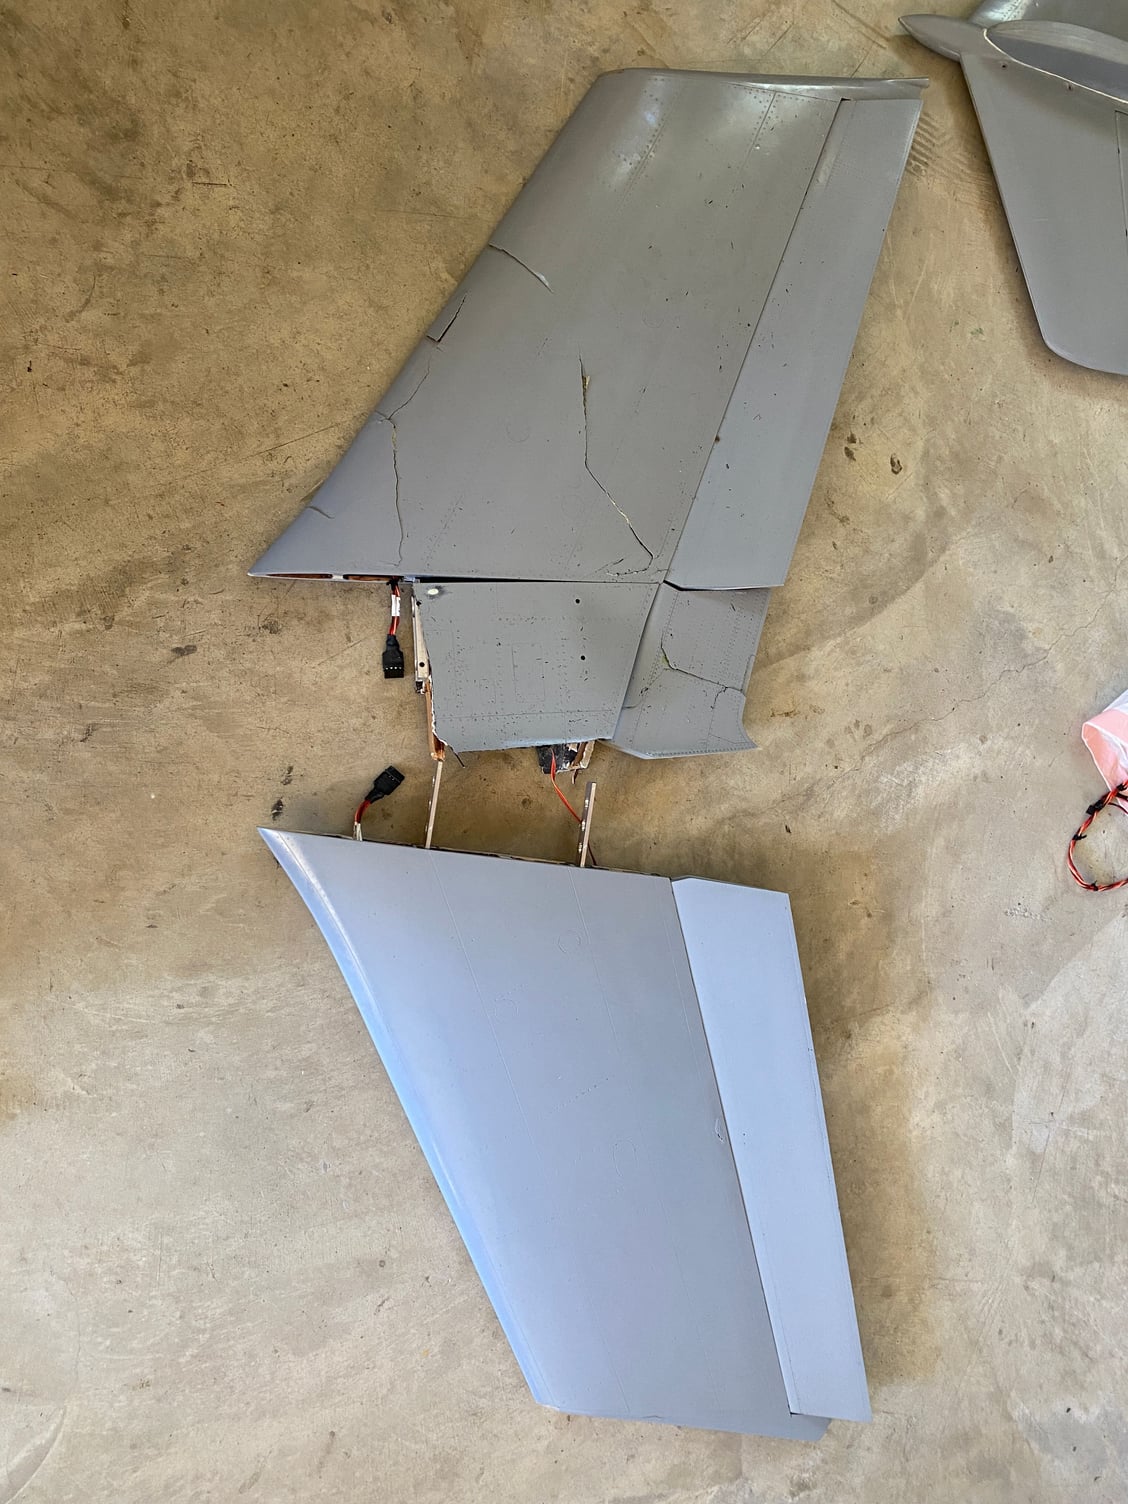
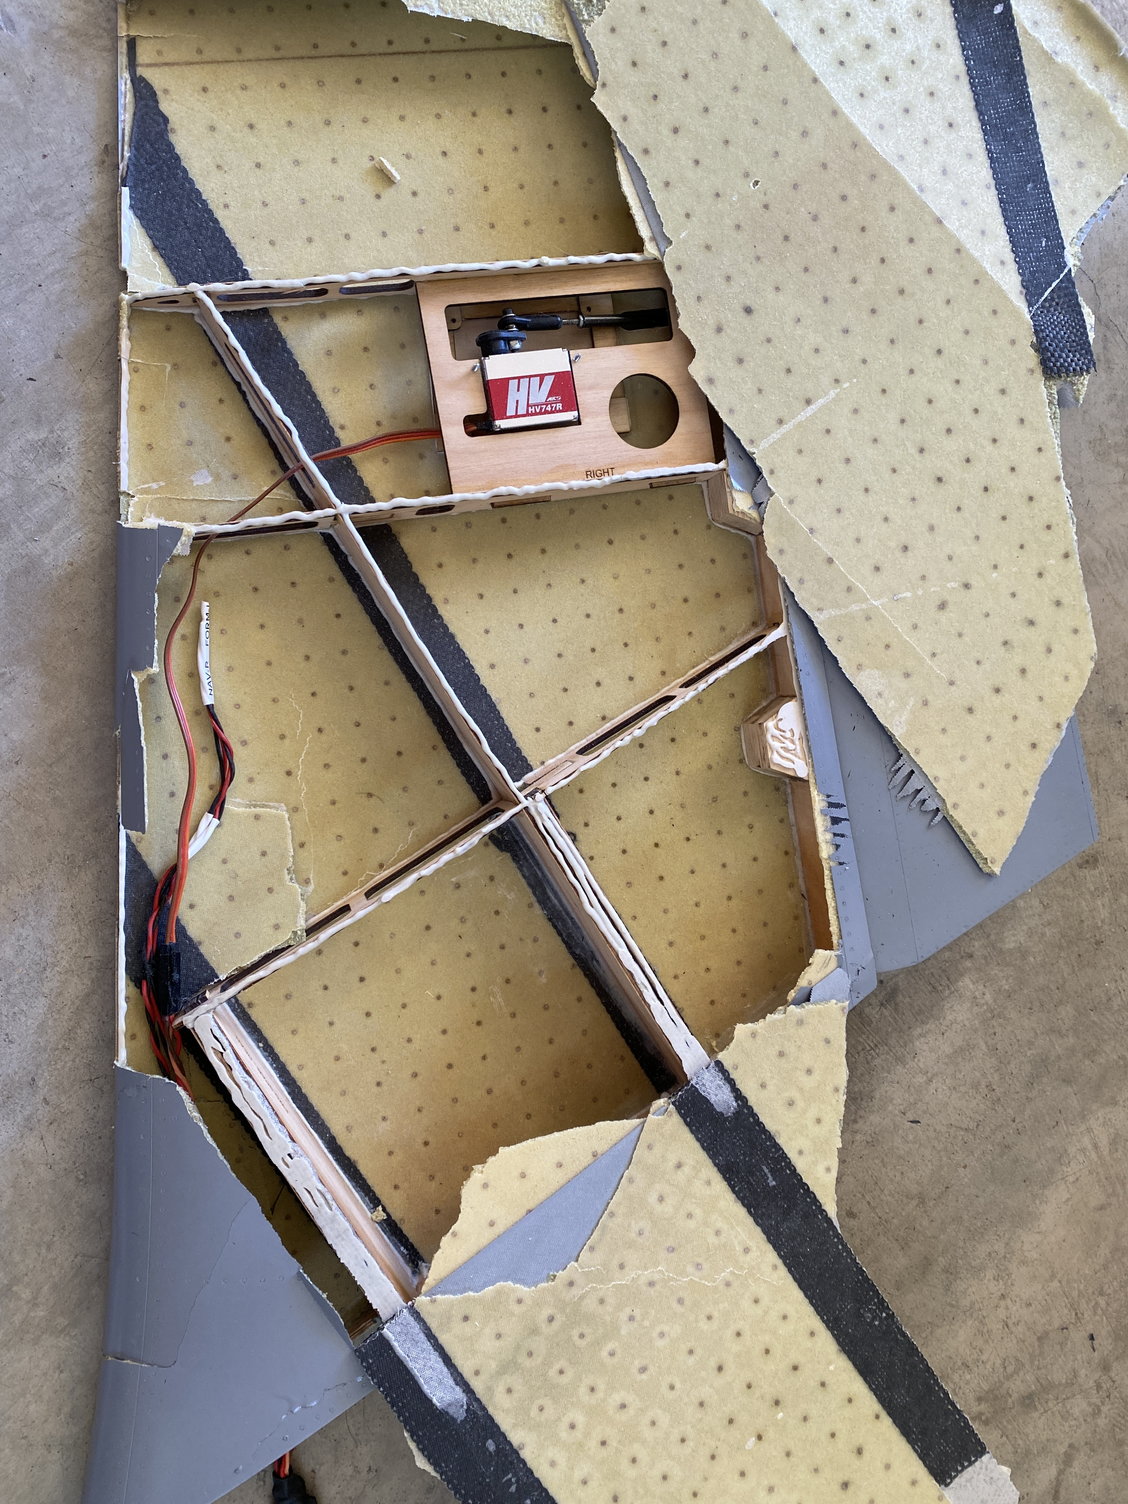
Spent the morning stripping the wreckage and looking for clues, especially in regards to some form of structural failure.
All control surfaces were still attached and linkages intact and able to move freely. Servos felt smooth, but have not been powered to check if they still work.The rear fuselage bulkhead that holds the elevator servo had fractured in multiple places and allowed the elevator servo to come loose, but I suspect that was a result of the impact.
Both flaperons and the left inner flap are undamaged. The tailplane has one minor crack in the upper fairing, but is otherwise undamaged.
The left wing was virtually undamaged, with just the loss of the last 1" on the trailing edge at the wing tip. No structural damage was observed. After loosening the retaining screws, it slid off the wing joiners easily at the crash site so that we could get it in the car.
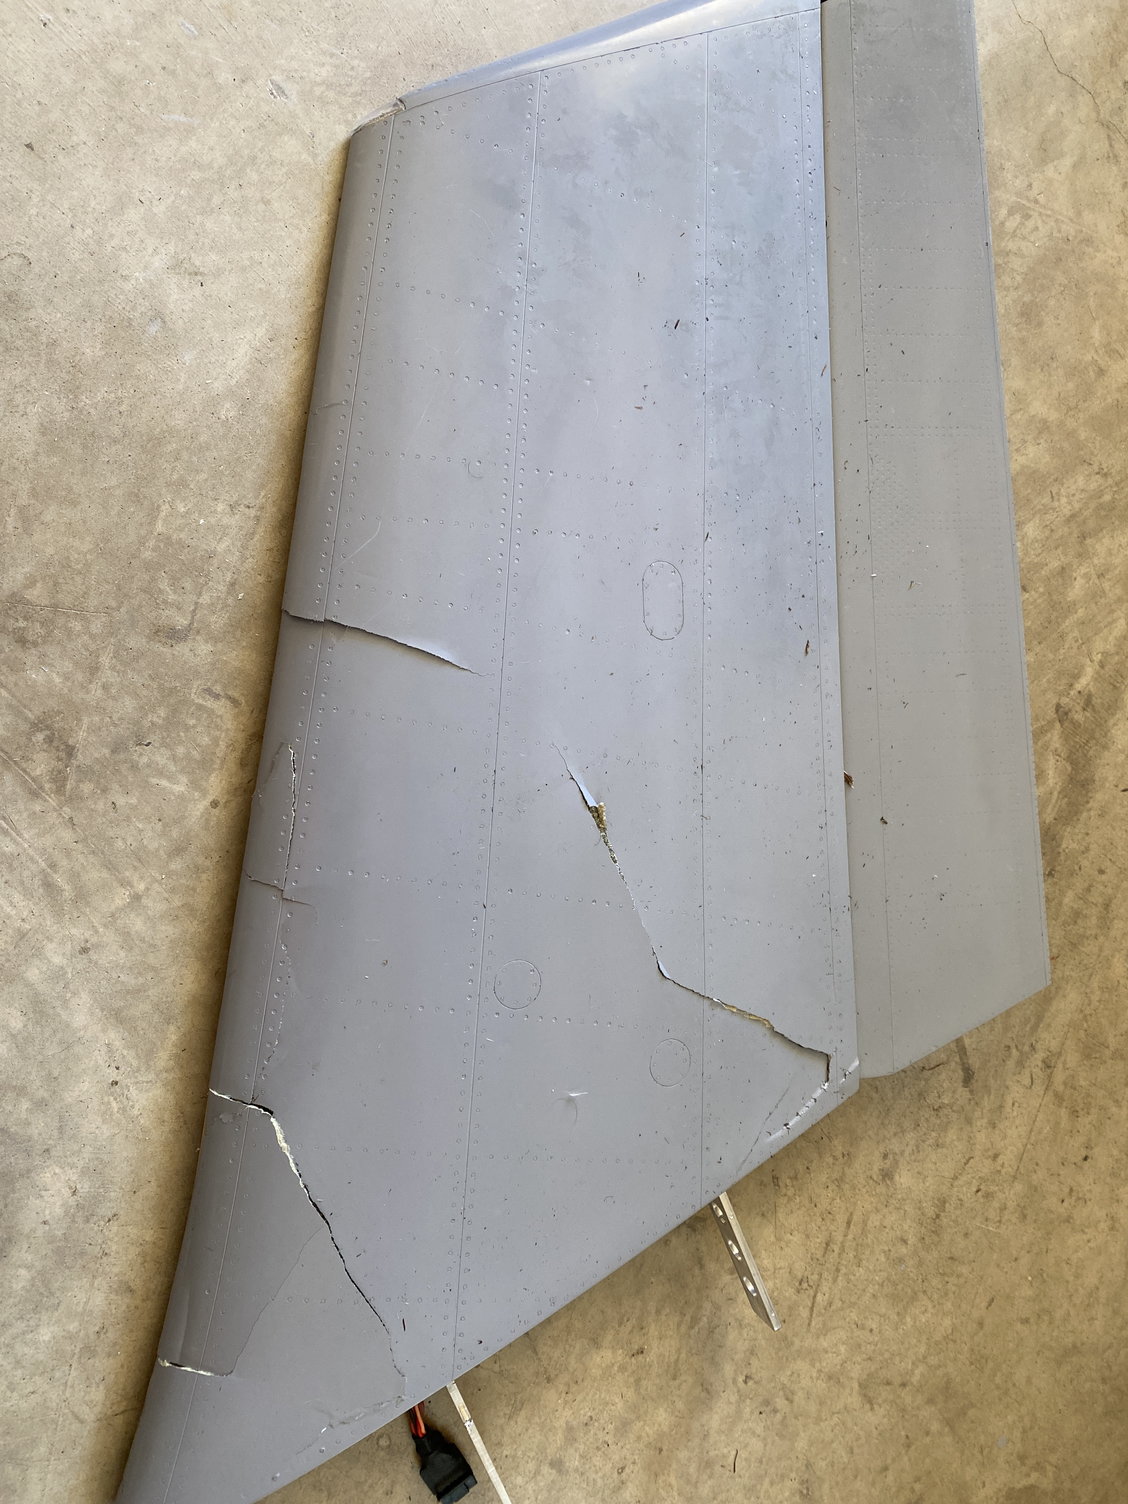
The right wing showed significant damage, and it had separated along with a section of the fuselage, which was easily removed at the wing joiners. The upper and lower skins were cracked in multiple places. On initial inspection it was not possible to tell if the damage was caused in-flight or by the impact.
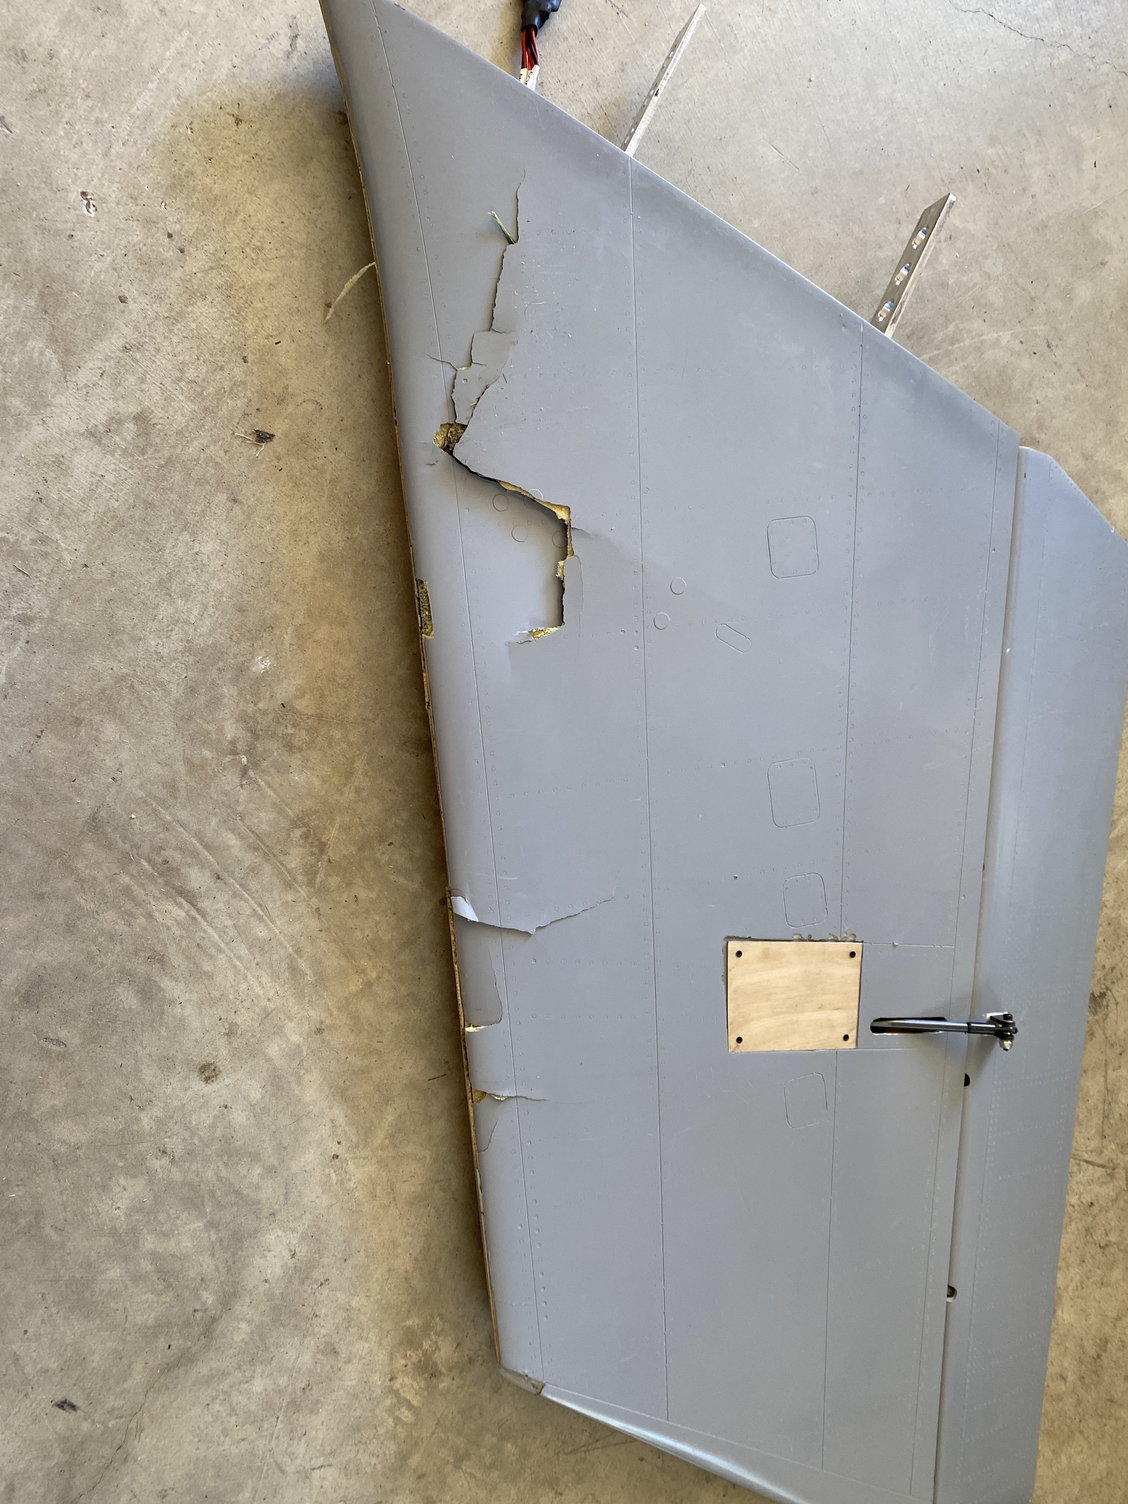
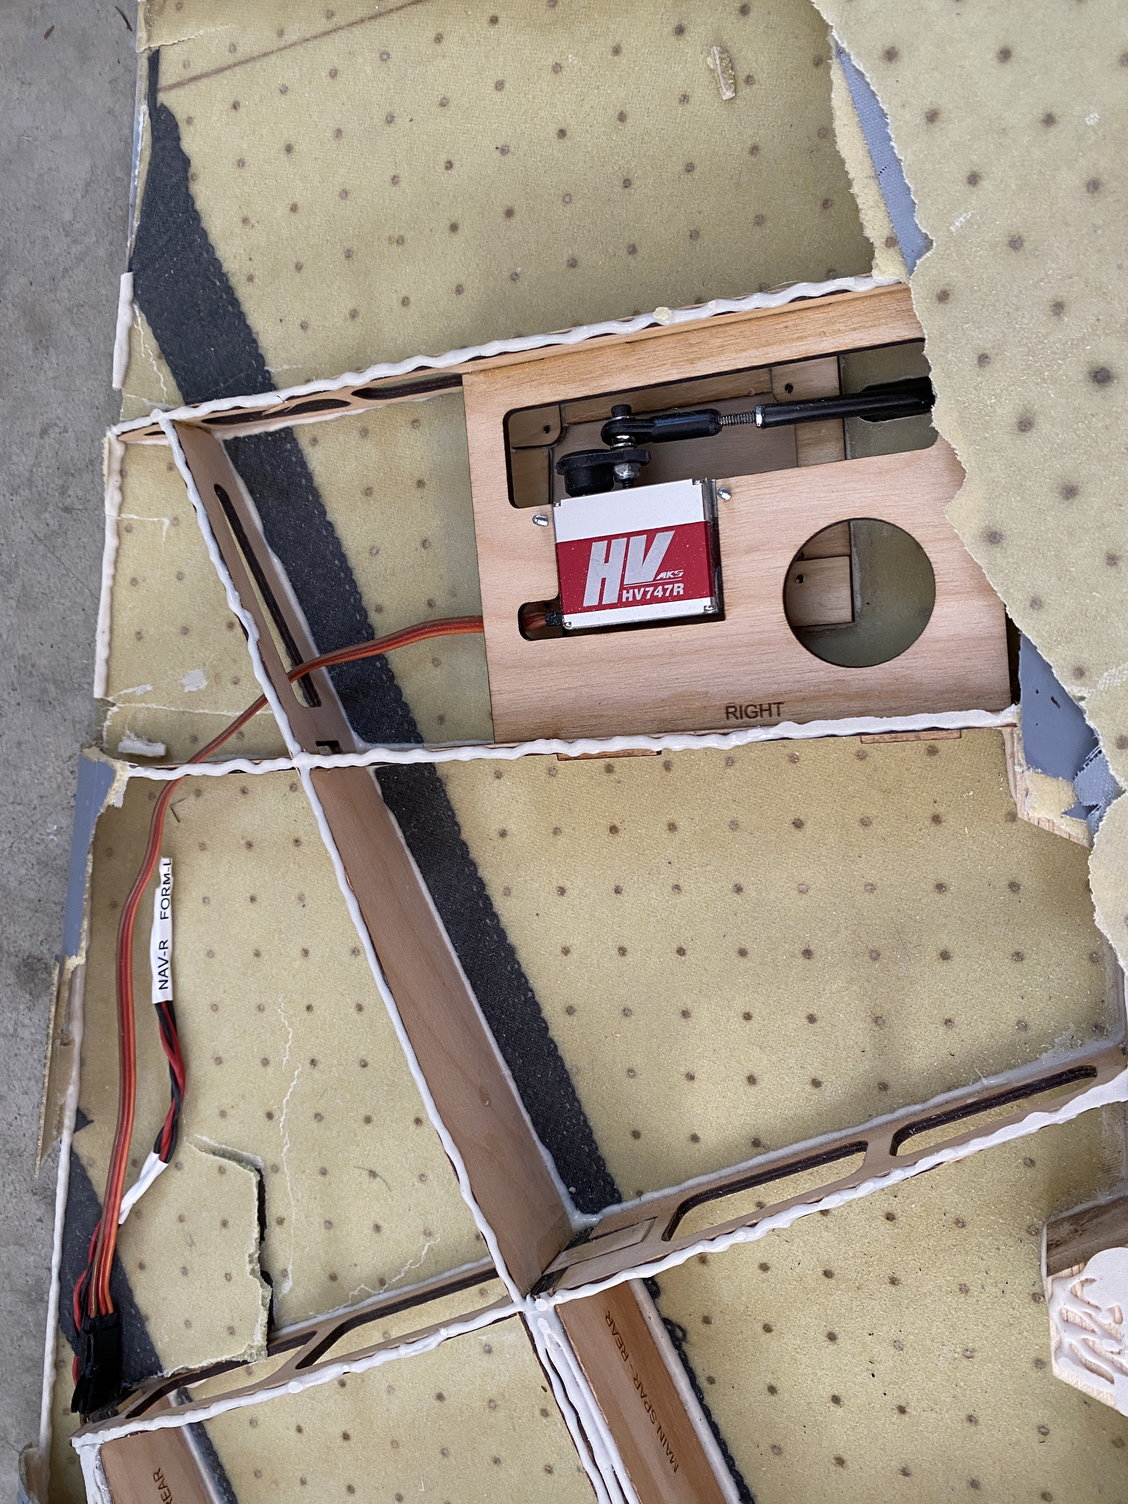
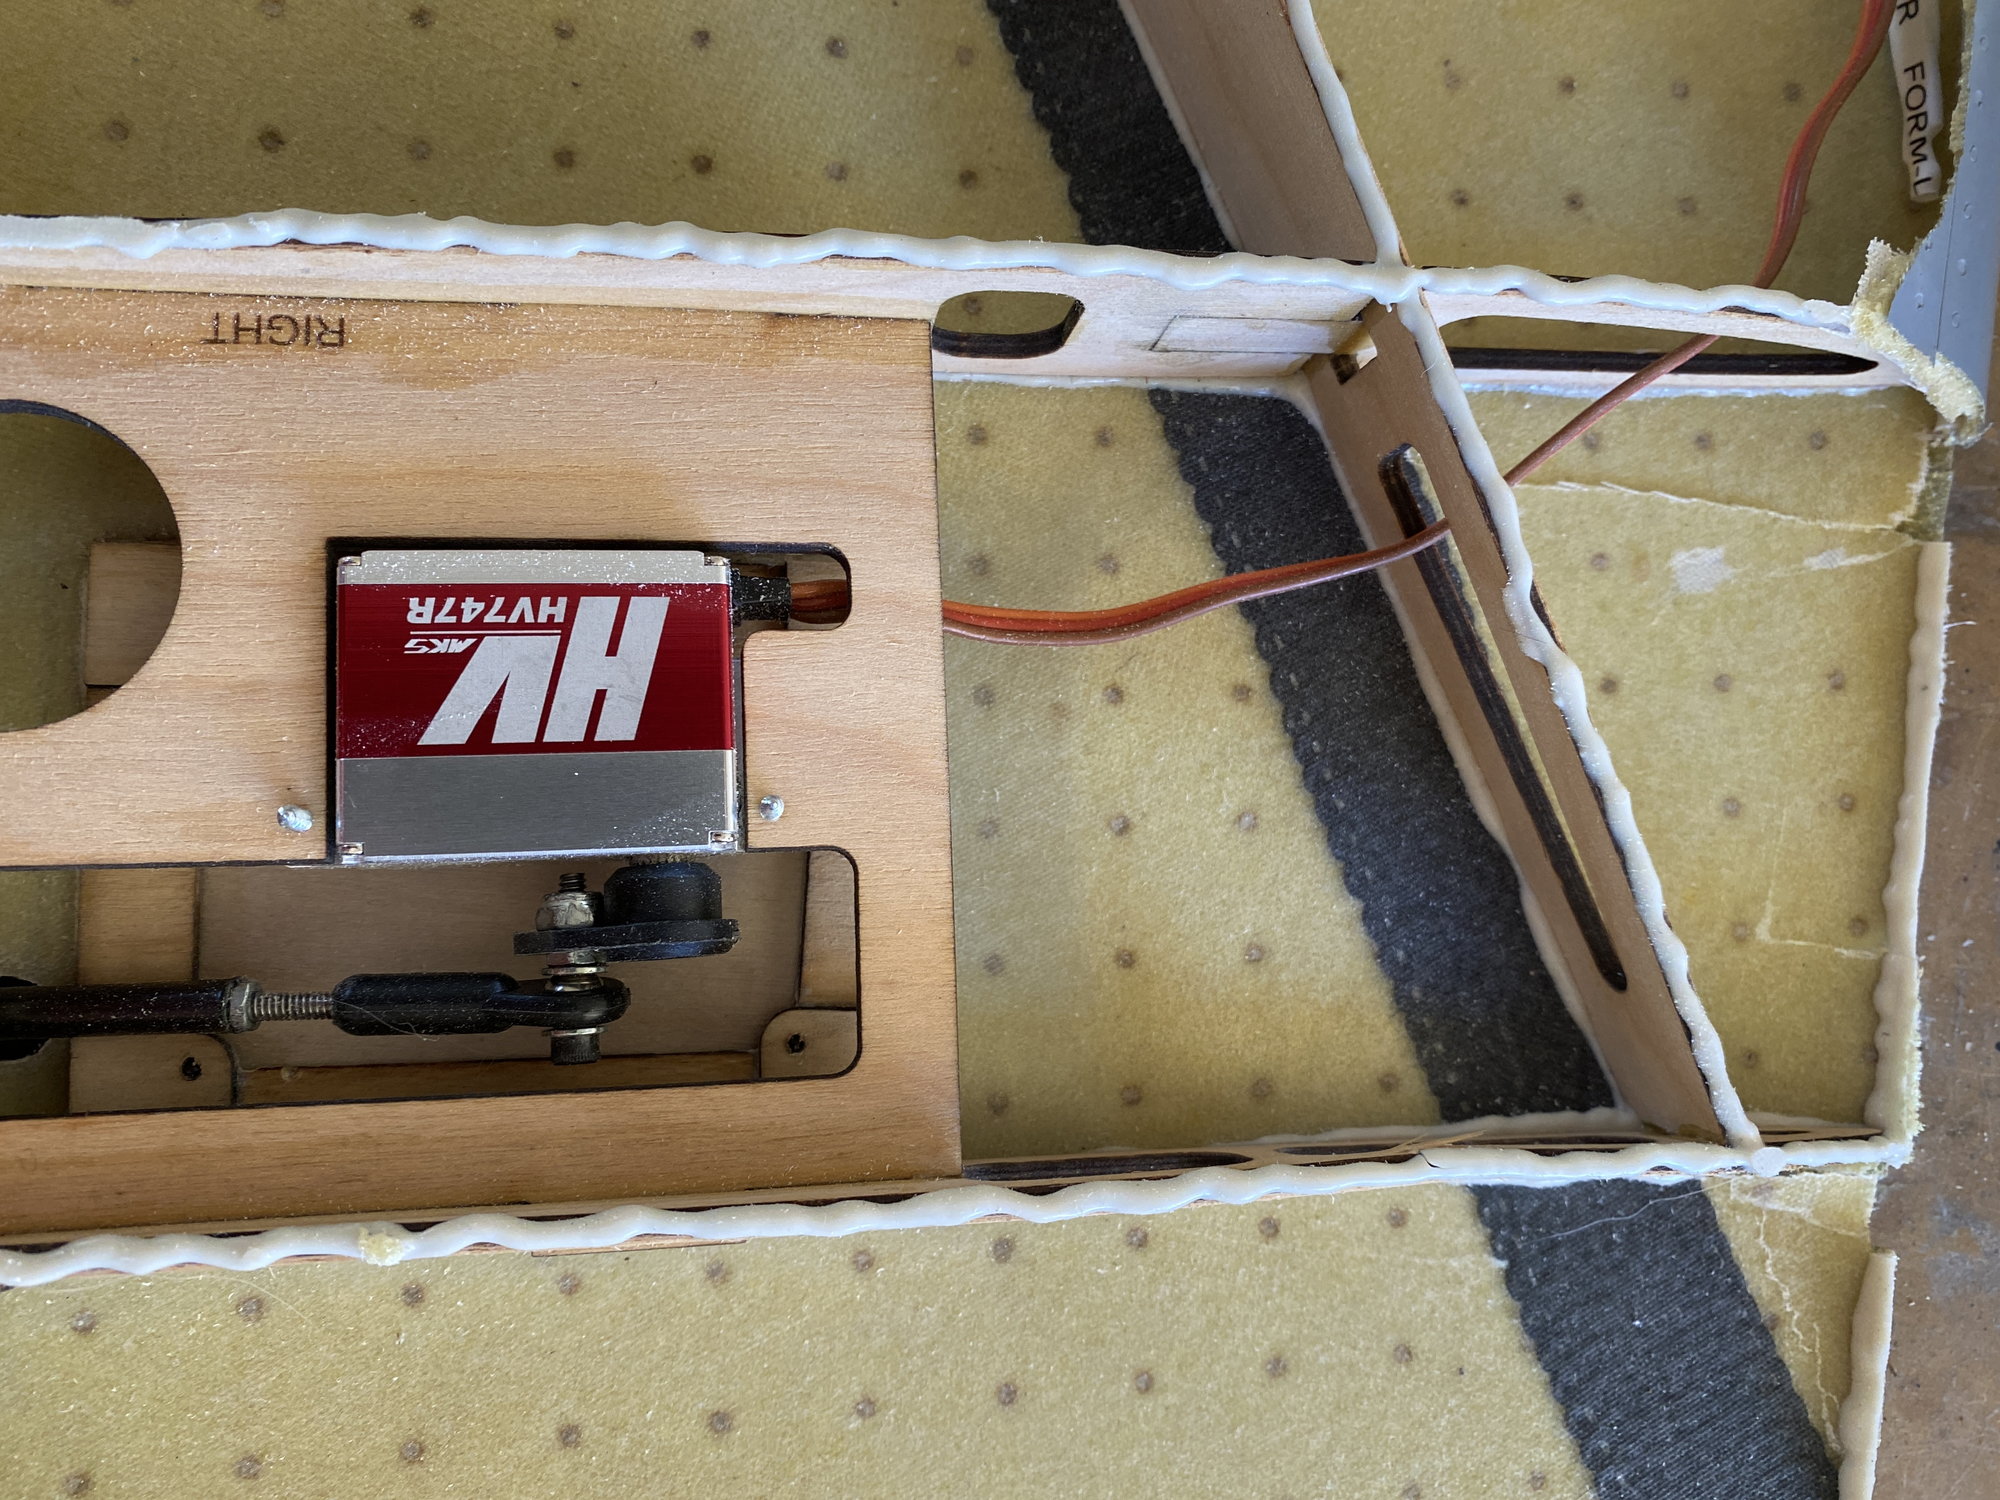
Further checking of the right wing showed that the upper skin was loose and could easily be removed. As I peeled back the skin it became apparent that it was not bonded to the internal structure. The Hysol on the structure showed very little contact with the skin.
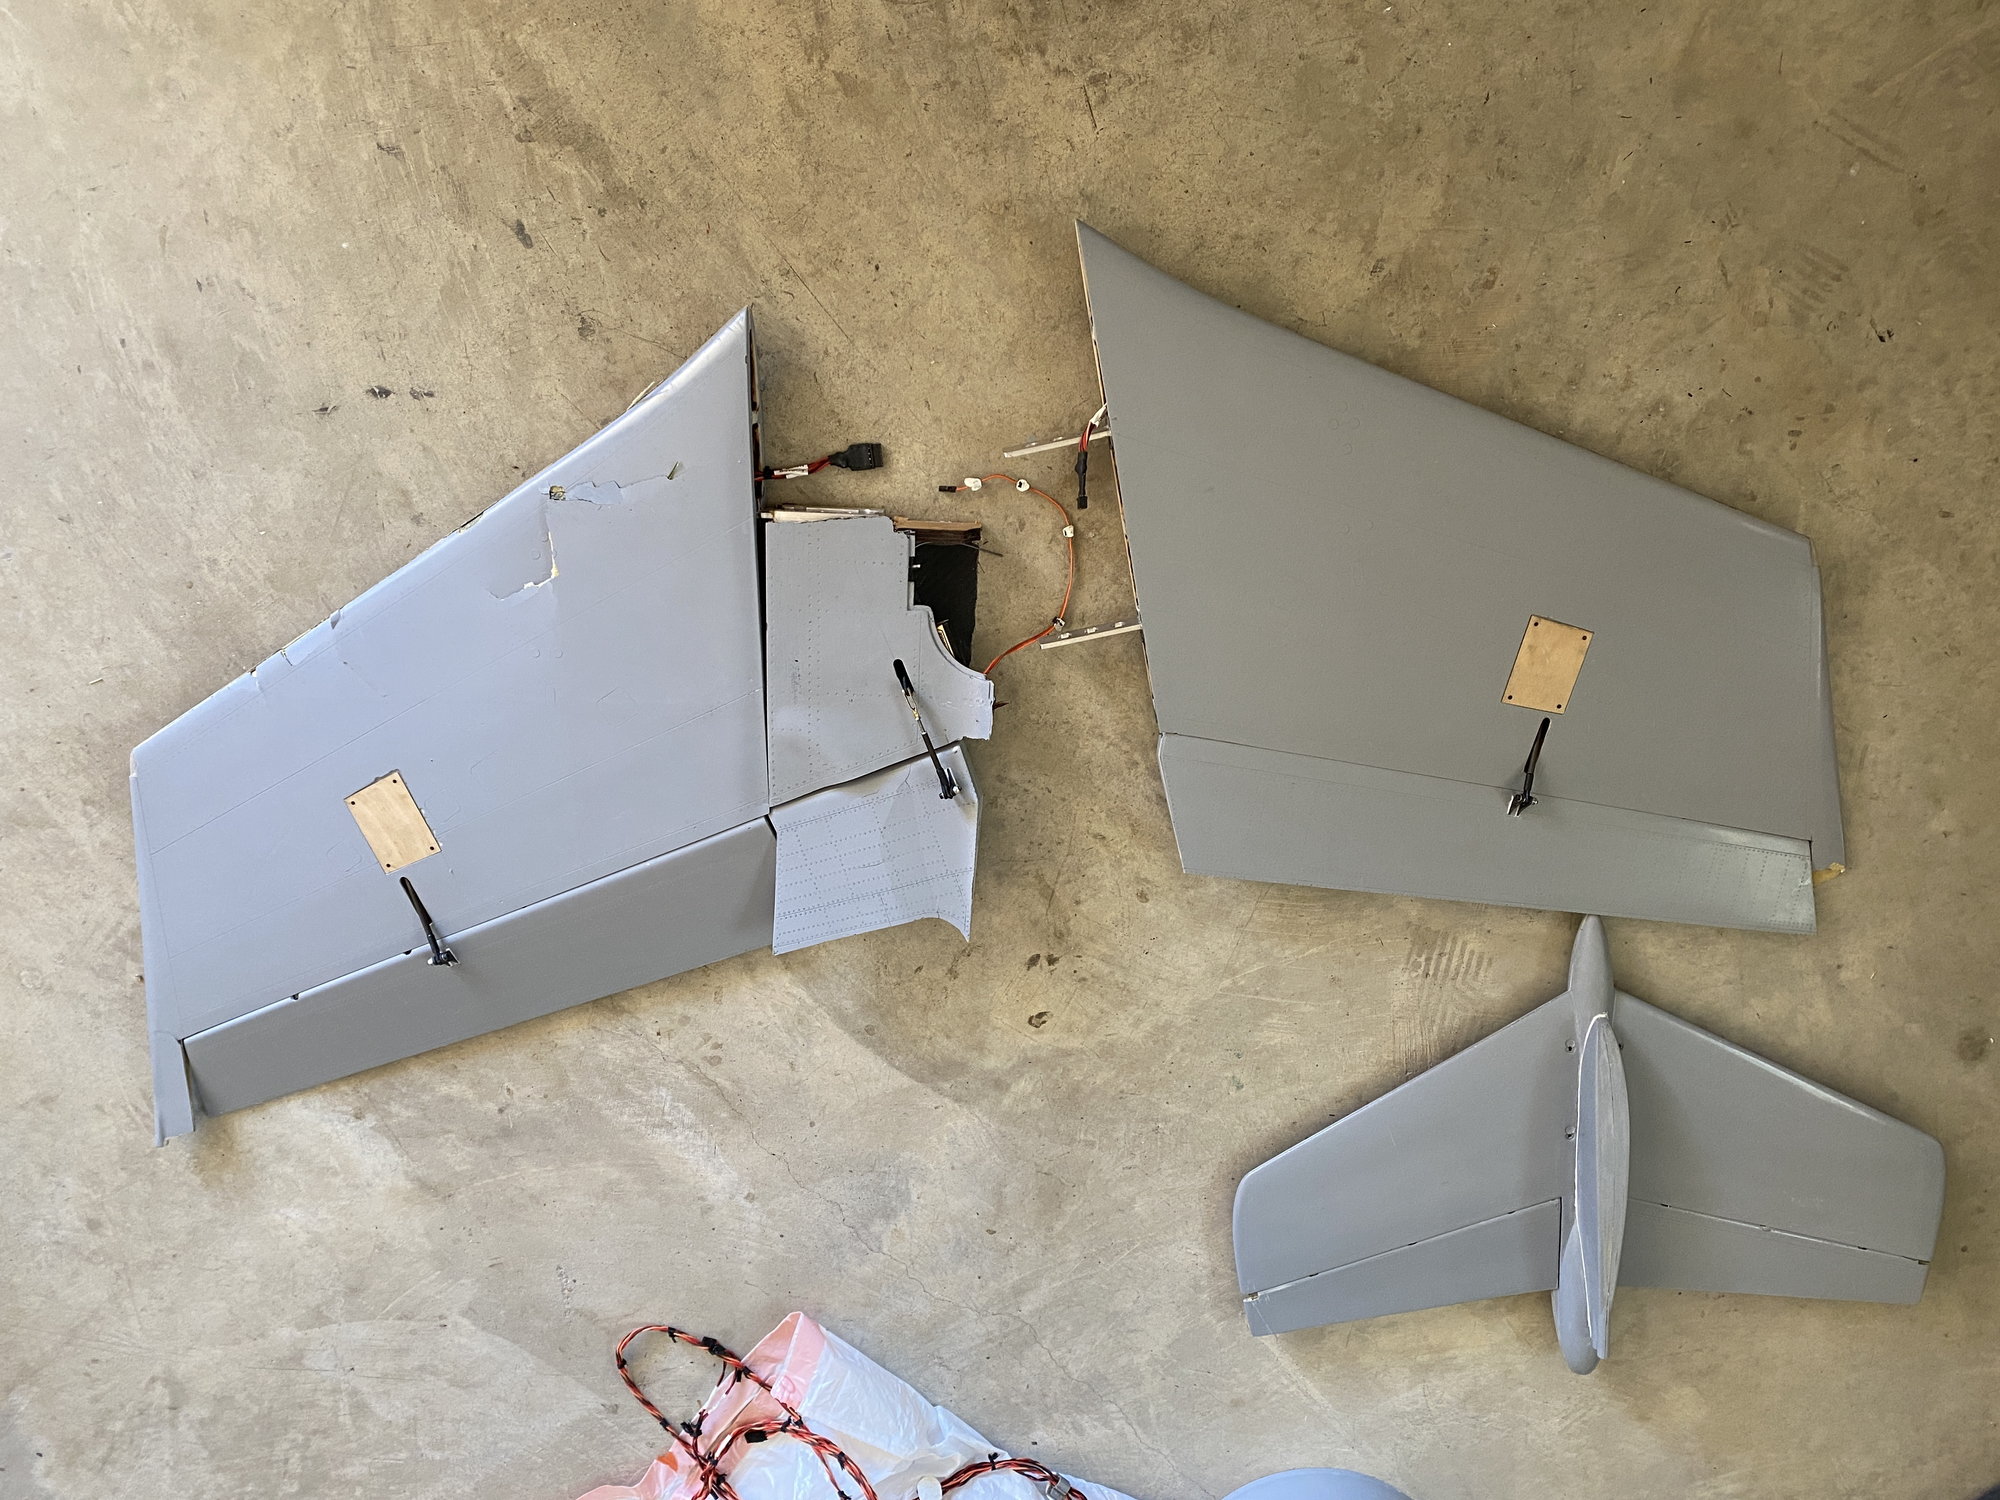
De-skinning the left wing showed that it was firmly attached and in contact in all areas, although the tolerances could be tightened up to reduce the glue thickness.
I feel confident that this lack of upper skin bonding to the internal structure resulted in a loss of torsional rigidity of the right wing. With the 3deg washout, there will be significant torsion acting on the outer wing and this is likely to have caused the right outer wing to fail, probably in a nose down direction, leading to the snap/ spin.
I'm currently not sure if I made an error in generating the internal structure in CAD, or if the built-up wing plugs caused a variation in wing thickness. Probably a combination of both, but it allowed at least a 1.5mm gap between the top of the structure and the upper skin across most of the structure, both ribs and spars. I had bonded the structure to the lower skin first and confirmed it was seated correctly, but it is really hard to check the closed structure once the top skin is down.
No one to blame apart from myself.......
Paul
All control surfaces were still attached and linkages intact and able to move freely. Servos felt smooth, but have not been powered to check if they still work.The rear fuselage bulkhead that holds the elevator servo had fractured in multiple places and allowed the elevator servo to come loose, but I suspect that was a result of the impact.
Both flaperons and the left inner flap are undamaged. The tailplane has one minor crack in the upper fairing, but is otherwise undamaged.
The left wing was virtually undamaged, with just the loss of the last 1" on the trailing edge at the wing tip. No structural damage was observed. After loosening the retaining screws, it slid off the wing joiners easily at the crash site so that we could get it in the car.
The right wing showed significant damage, and it had separated along with a section of the fuselage, which was easily removed at the wing joiners. The upper and lower skins were cracked in multiple places. On initial inspection it was not possible to tell if the damage was caused in-flight or by the impact.
Further checking of the right wing showed that the upper skin was loose and could easily be removed. As I peeled back the skin it became apparent that it was not bonded to the internal structure. The Hysol on the structure showed very little contact with the skin.
De-skinning the left wing showed that it was firmly attached and in contact in all areas, although the tolerances could be tightened up to reduce the glue thickness.
I feel confident that this lack of upper skin bonding to the internal structure resulted in a loss of torsional rigidity of the right wing. With the 3deg washout, there will be significant torsion acting on the outer wing and this is likely to have caused the right outer wing to fail, probably in a nose down direction, leading to the snap/ spin.
I'm currently not sure if I made an error in generating the internal structure in CAD, or if the built-up wing plugs caused a variation in wing thickness. Probably a combination of both, but it allowed at least a 1.5mm gap between the top of the structure and the upper skin across most of the structure, both ribs and spars. I had bonded the structure to the lower skin first and confirmed it was seated correctly, but it is really hard to check the closed structure once the top skin is down.
No one to blame apart from myself.......
Paul
 10-28-2021, 11:53 PM
#684

Really saddened for your loss, Paul, really tragic. Lets hope you can resurrect the project.
Its always risky to speculate on the cause of a crash but that said, heres my take on the evidence you have shown.
If the right wing upper skin was not bonded it would likely have balloned, increasing camber and lift , so producing a roll and maybe spin to the LEFT not right.
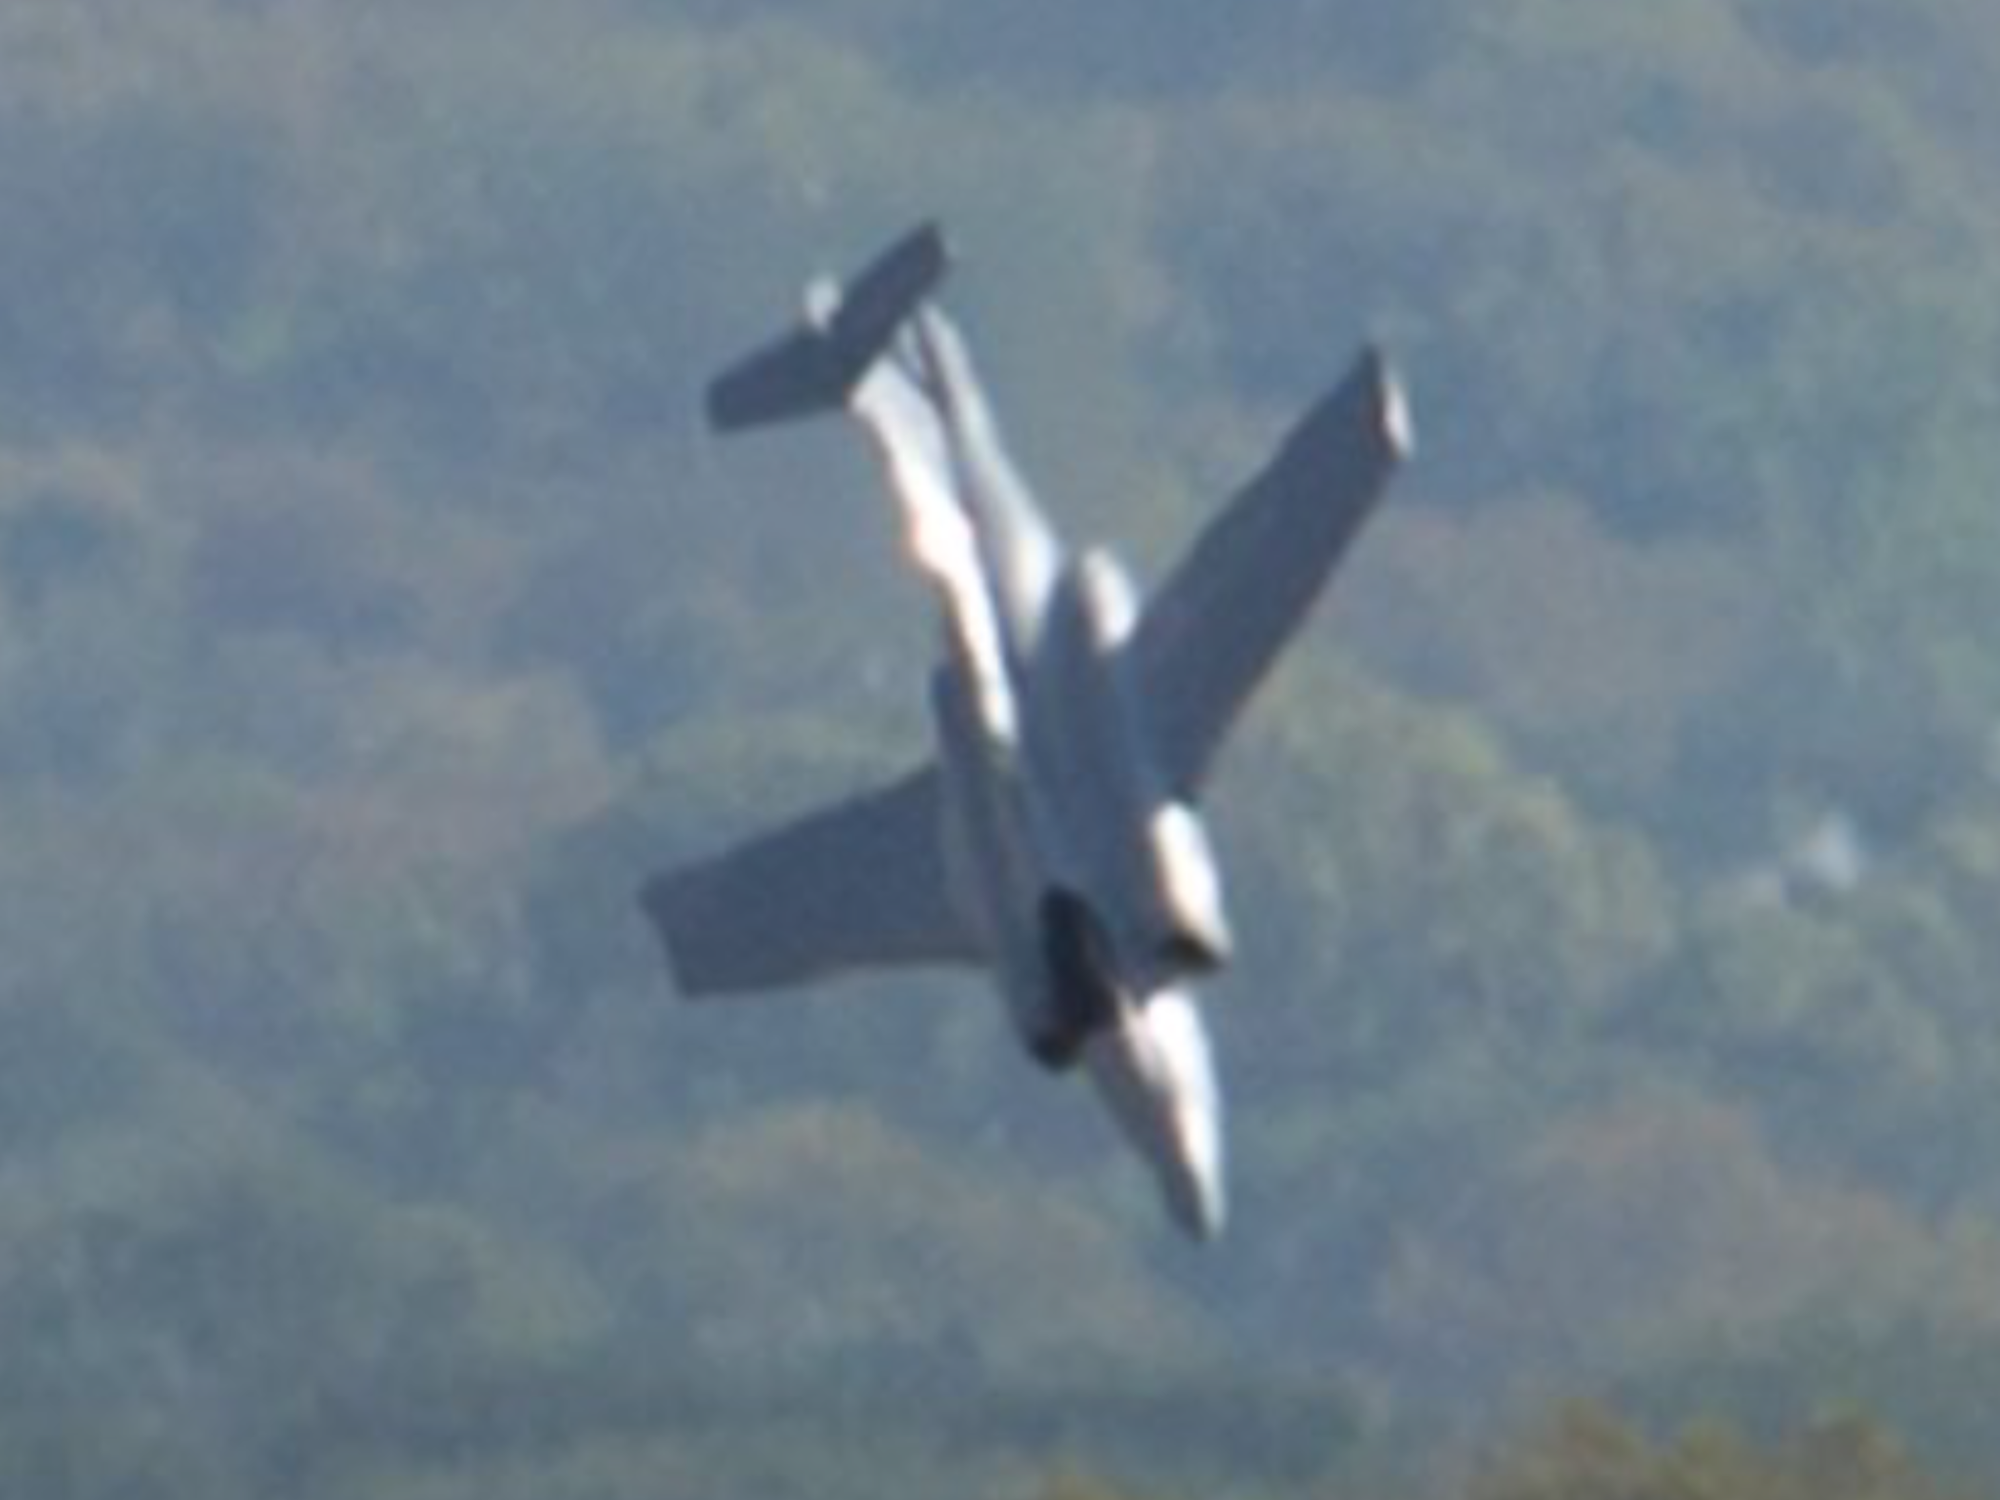
Now, take a look of the last still ( just above the railway line) with the model spinning and look carefully, enlarged, at the RIGHT leading edge. That leading edge is not straight as is the left, something is protruding forward for the outboard half of that wing section. Skin separation, failure of the leading edge, resulting in an upward twist and stall of that section of wing ?
To. me that suggests the skin has separated at the le, resulting in a huge loss of lift and increase of drag, perfect conditions for autorotation, spinning.
Maybe, just maybe, but possible.
Anyway, a succesful first flight proves the model is certainly perfectly flyable, so lets hope #3 is a huge success.
Look at outboard section of right wing le.
Its always risky to speculate on the cause of a crash but that said, heres my take on the evidence you have shown.
If the right wing upper skin was not bonded it would likely have balloned, increasing camber and lift , so producing a roll and maybe spin to the LEFT not right.
Now, take a look of the last still ( just above the railway line) with the model spinning and look carefully, enlarged, at the RIGHT leading edge. That leading edge is not straight as is the left, something is protruding forward for the outboard half of that wing section. Skin separation, failure of the leading edge, resulting in an upward twist and stall of that section of wing ?
To. me that suggests the skin has separated at the le, resulting in a huge loss of lift and increase of drag, perfect conditions for autorotation, spinning.
Maybe, just maybe, but possible.
Anyway, a succesful first flight proves the model is certainly perfectly flyable, so lets hope #3 is a huge success.
Look at outboard section of right wing le.
Last edited by David Gladwin; 10-29-2021 at 04:13 AM.
10-29-2021, 02:24 PM
#687
Easiest way to tell is simply plug them in, if the LED lights on the camera light up you
should be good to go after downloading the included app. If they do work they work great.

The following users liked this post:
yeahbaby (10-29-2021)
10-29-2021, 06:52 PM
#690
Thanks all for all the comments and support.
Confirming that there will be a Bucc #3. Just catching up on some deferred maintenance on my other planes before starting back on the Bucc.
David G - thanks - I had done the same, resampling the original photo and zooming in to get a full screen view of that last photo before impact. There are some very strange aberrations in the image, such as the radome appears short and blunt and there is an obvious kink in the LEFT wing trailing edge, which is most definitely not there as both flaperons survived the crash intact and are fully usable again. These aberrations make interpreting the image difficult, but there is clearly something different between the 2 wings. Based on all the evidence, I am confident that the RIGHT wing failed due to lack of a bond between the upper skin and the internal structure. That resulted in a loss of torsional strength, which likely led to a leading edge bond failure and the skin tears. Loss of the model was inevitable.
I have used the surviving structure to accurately measure the required offset to contact the skins and have already generated the updated CAD for the new structure. I have not found the 'smoking gun' as to what went wrong with the previous design, but both wings are very similar - I must have used slightly more glue on the left wing that resulted in it bridging the gap. I will also re-introduce a lap-joint across the leading edge to ensure a wider glue joint and not just rely on the thickness of the skins butt-joined together. I used this on the first Bucc, but omitted them from #2.
Paul
The following users liked this post:
erh7771 (11-08-2021)
10-29-2021, 10:42 PM
#691

Glad to hear there will be a third Buc!
what i have been doing for my leading edge seam joints is CA gluing a piece of 1/16� balsa strip or scrap airex( about 1/4 to 3/8� wide ) roughly 1/8� aft of the leading edge with it standing vertically. This creates a splooge �Dam�. Splooge is generously applied along the leading edge and up against the Dam prior to closing up the mold halves
this ends up being slightly heavier, but its near impossible to open up the LE seam.
The following users liked this post:
patf (11-01-2021)
09-11-2022, 08:45 AM
#692
Well, it's been almost a year since the loss of Bucc #2, and I am extremely happy to report that Bucc # 3 has now successfully flown.
I started on #3 immediately after the loss of #2, correcting the wing rib profiles using the remains of the crashed wing to determine the design changes. I added a layer of spread tow carbon cloth on the wing skin layup just to give an additional level of torsional strength.
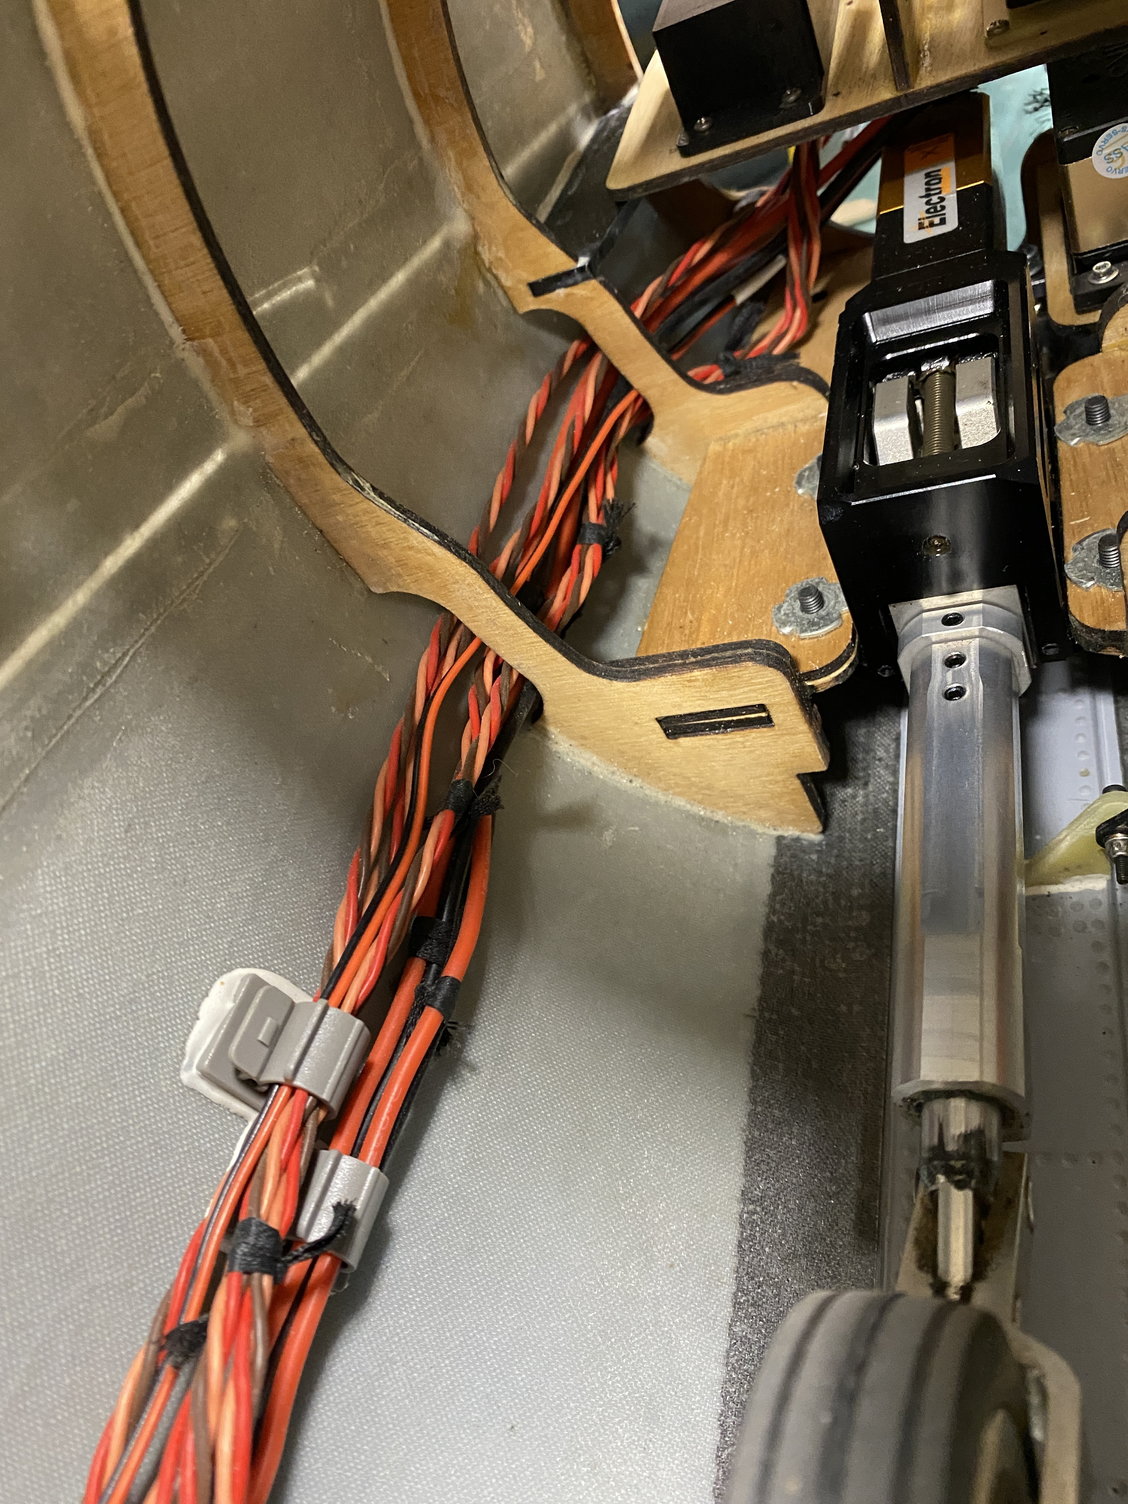
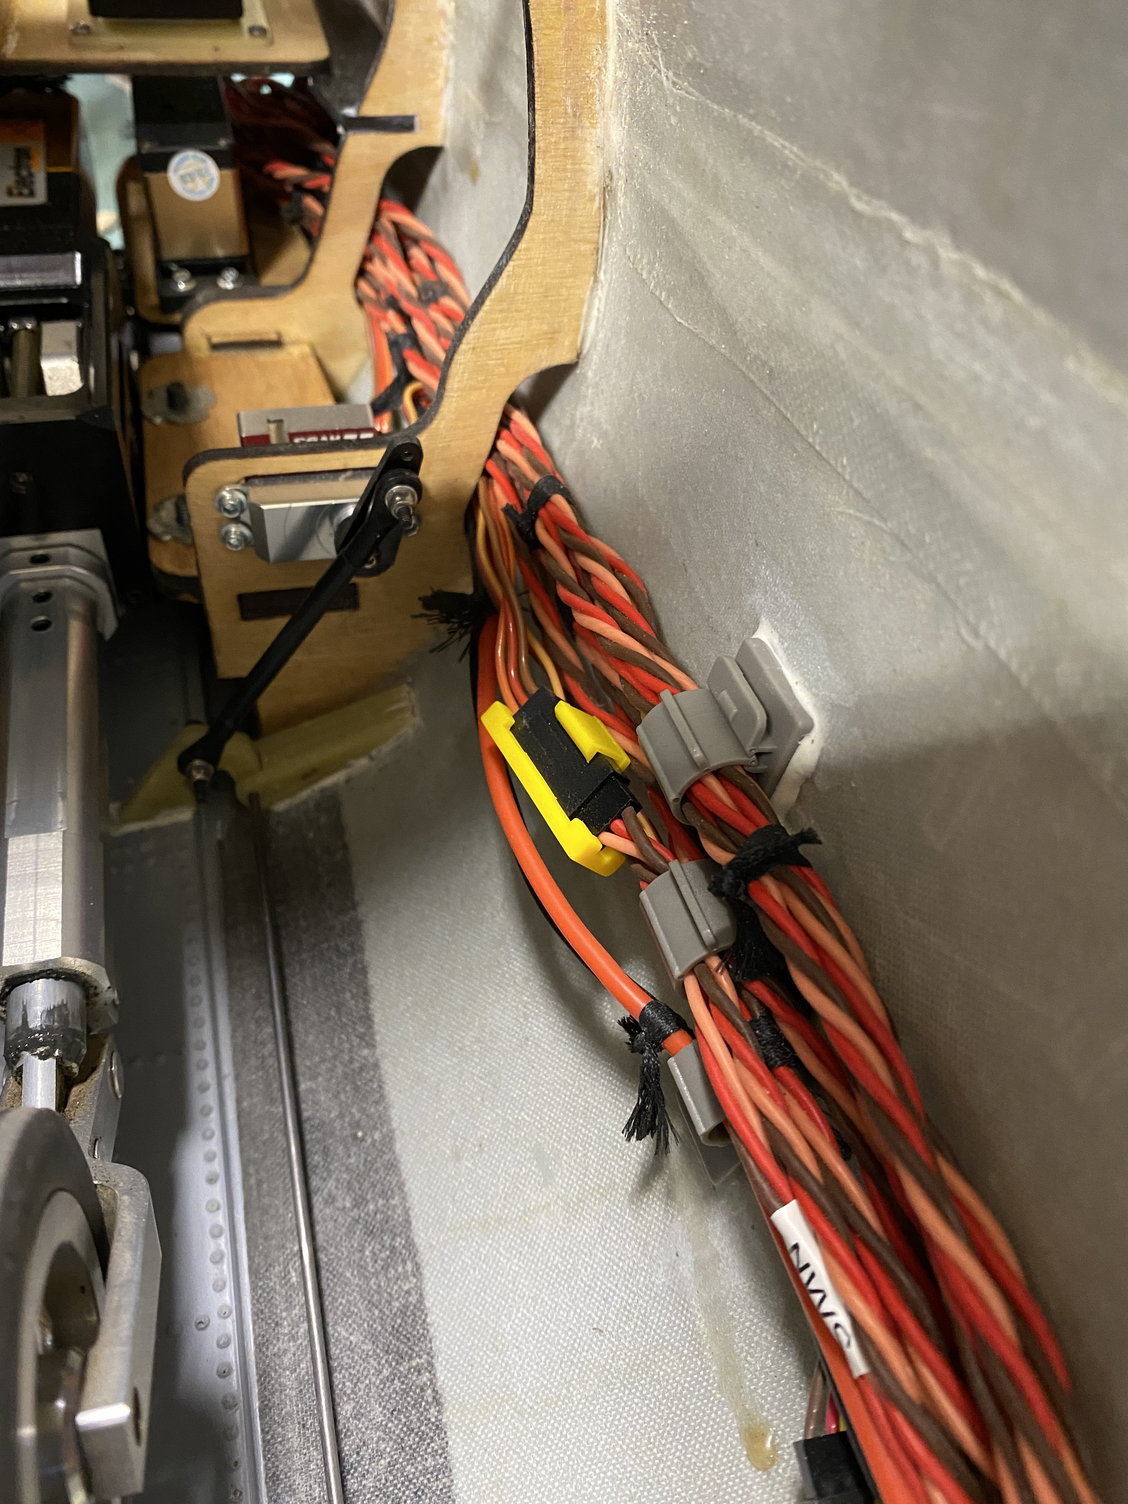
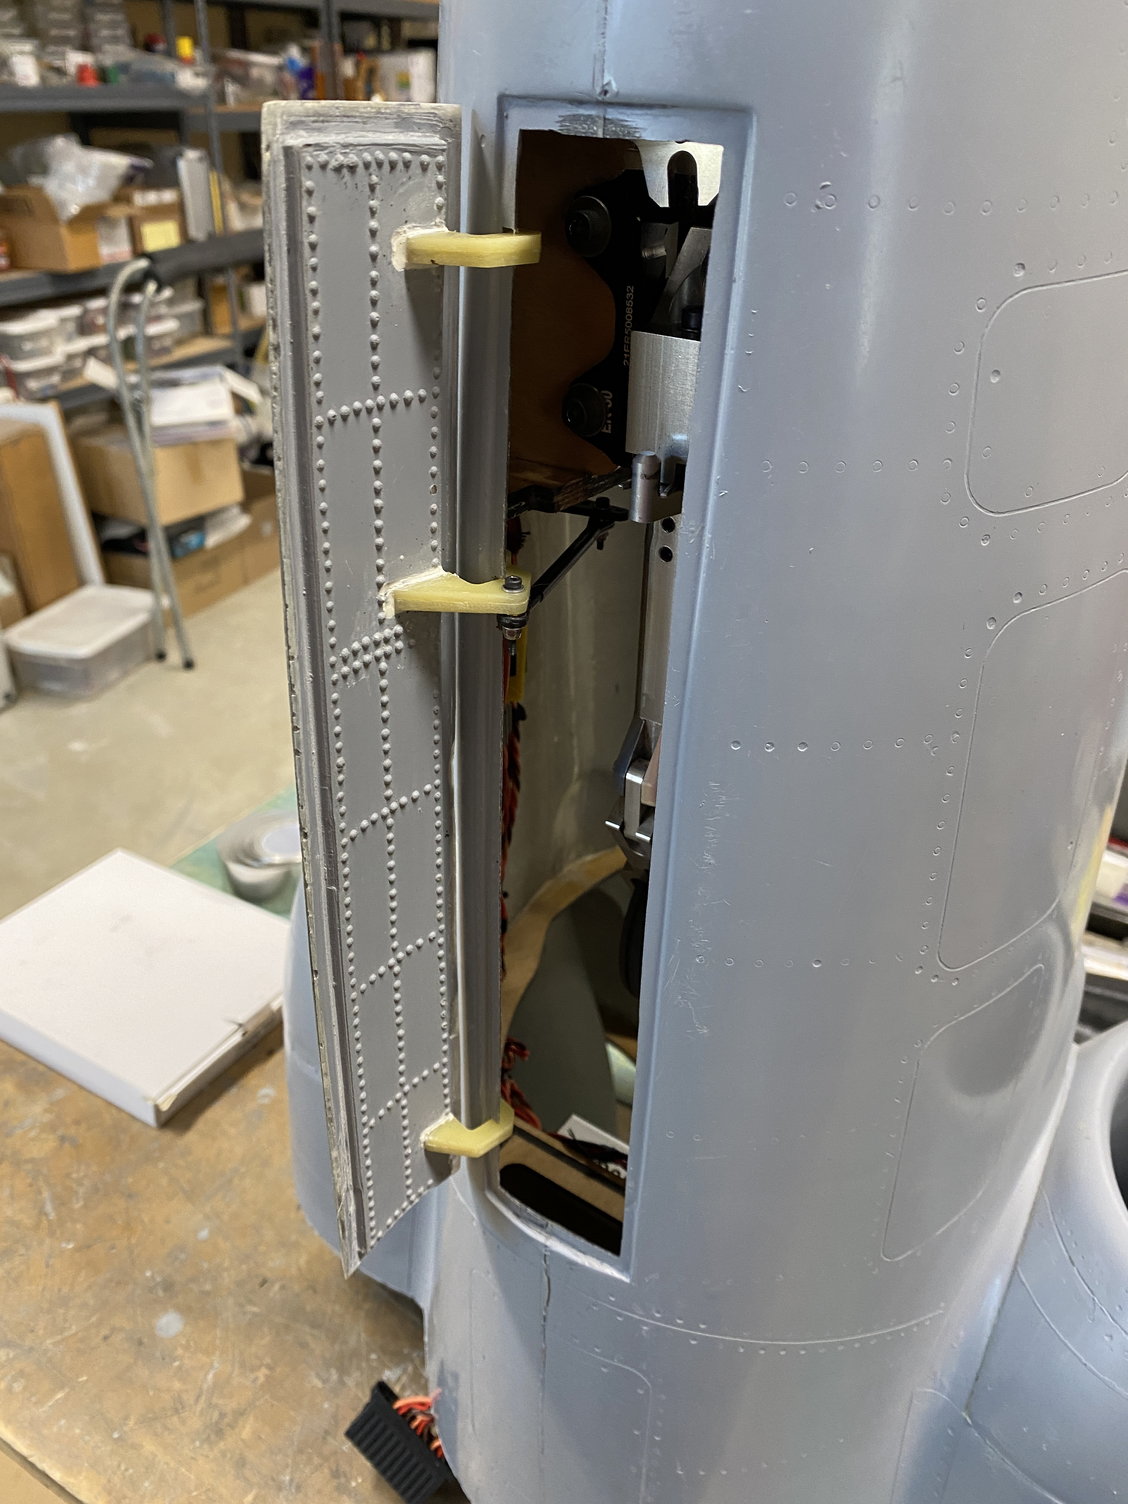
No other major changes over and above the previous version were made apart from making 'mouse-holes' in each of the fuselage frames to allow the wiring harnesses to pass through the frames, rather than having to loop up over them - it makes for a much neater installation. I did re-create the nose gear door plug and mold to make it more scale with increased internal thickness with a foam core and added raised rivet surface detail. Those changes resulted in a much stiffer door compared to the previous single skin design. The nose gear door servo was also changed to one with 4 mounting screws to give more rigidity. I did try to re-orientate the servo, but it would have interfered with the stay-out volume I am retaining to add cockpit detail at a later time.

The build was ~90% complete early in 2022, but then a combination of busy work and family life and some burn-out on the build made me slow down significantly. Once it all came together, I discovered engine problems that needed one motor to be sent back to Spain for repair. I tried to perform first flight about a month ago, but was thwarted by one main wheel brake electromagnet failing. The new design Electron ER-50 brakes are much stronger than the older design ones I started with, so braking performance is now significantly improved.
While waiting on the replacement brake units, I did start to clean up some of the joints and seams, and add final paint, at least on the smaller parts. I'm using KlassKote epoxy satin finish and I am really happy with the results so far.
I started on #3 immediately after the loss of #2, correcting the wing rib profiles using the remains of the crashed wing to determine the design changes. I added a layer of spread tow carbon cloth on the wing skin layup just to give an additional level of torsional strength.
No other major changes over and above the previous version were made apart from making 'mouse-holes' in each of the fuselage frames to allow the wiring harnesses to pass through the frames, rather than having to loop up over them - it makes for a much neater installation. I did re-create the nose gear door plug and mold to make it more scale with increased internal thickness with a foam core and added raised rivet surface detail. Those changes resulted in a much stiffer door compared to the previous single skin design. The nose gear door servo was also changed to one with 4 mounting screws to give more rigidity. I did try to re-orientate the servo, but it would have interfered with the stay-out volume I am retaining to add cockpit detail at a later time.
The build was ~90% complete early in 2022, but then a combination of busy work and family life and some burn-out on the build made me slow down significantly. Once it all came together, I discovered engine problems that needed one motor to be sent back to Spain for repair. I tried to perform first flight about a month ago, but was thwarted by one main wheel brake electromagnet failing. The new design Electron ER-50 brakes are much stronger than the older design ones I started with, so braking performance is now significantly improved.
While waiting on the replacement brake units, I did start to clean up some of the joints and seams, and add final paint, at least on the smaller parts. I'm using KlassKote epoxy satin finish and I am really happy with the results so far.
Last edited by JSF-TC; 09-11-2022 at 12:12 PM.
09-11-2022, 09:09 AM
#693
First flight was this week in the lead-up to the Waco HOTMAC 40th Annual Southwest Jet Rally.
The first take-off was a bit 'exciting' as the model was out of trim in both pitch and roll, so the first few seconds were a bit of a roller-coaster until I got it headed away from the ground and settled down. The Jeti auto-trim function quickly helped dial out most of the trim issues during the first circuit. I left take off flap and the gear down for the first flight, just concentrating on getting the trim set and getting in tune with how it flew. It was a bit sensitive in roll, but one I brought the gyro online to a nominal gain setting the roll response settled down into a very predictable manner. I flew for around 5 minutes, with multiple practice approaches and overshoots before committing to a landing. I held power until the flare, just in case it wanted to sink, but it floated on by and landed in the second half of the runway, touching down smoothly. The new brakes were very effective and it came to a stop in less than 300ft, right at the end of Waco's 800ft runway. Taxy back and shutdown were normal. Time to relax and take a deep breath.
Following a check over, where no issues were found, flight 2 was flown. Now in trim, the take off was perfect with a smooth rotation and lift off. On the second circuit ,the gear was retracted with no trim change, followed by retracting the flaps. Some trim changes were noted and the trims were reset. I now had a very smooth and stable flying model that was flying happily at less than half throttle. After a few laps savoring the sight of some relatively low passes I lowered the gear and set take off flap. No issues in this config so I selected full flap, but it needed re-trimming so as I felt it was time to land, I elected to go back to take-off flap. The second landing was better, with idle being selected earlier and the touchdown was about center field, still with some float.
Third flight I tried a full stick roll - a little fast but easily fixed with adjusting the rates, then I spent time looking at full flap landing configuration.The model felt a handful, very sensitive in roll, which the gyro helped some, but it was still not comfortable, but I adjusted enough to fly the landing with full flap. No issues with the landing again.
Post flight I discovered that the aileron rate setting in landing flap flight mode was a lot higher than for take off and flaps up flight modes, so this was corrected, and all aileron rates were lowered a bit.
Flight 4 was very comfortable in all flight modes. The reduced aileron rates in landing flap transformed the model and it was now very predictable. One interesting characteristic that I need to investigate further is that with full flap (both inboard flaps and drooped flaperons), the model wants to constantly roll out of the turn back to wings level, and you have to hold in proverse roll stick throughout the turn. It feels strange, but easily adjusted to. The speed brake was opened in flight part-way, with nothing more than what was perceived to be a slight climb. A full flap landing was flown with the speed brake fully opened in the flare with touchdown again in center field. Tracking under full braking was along the center-line throughout.
Overall I managed 5 flights this weekend and each one was getting better and better, with minor adjustments after each one. The only other major item to investigate is the effect of the tailplane flaps - I have them on a slider and left them closed for these initial flights. I want to investigate the effect they have on elevator servo load (looking at overall current draw) before deciding on if I should mix them in with the flaps and flight modes.
I received lots of compliments, and received the Pilot's Choice award at the rally, even though it is not yet finished. Thanks to all that voted for the Bucc.
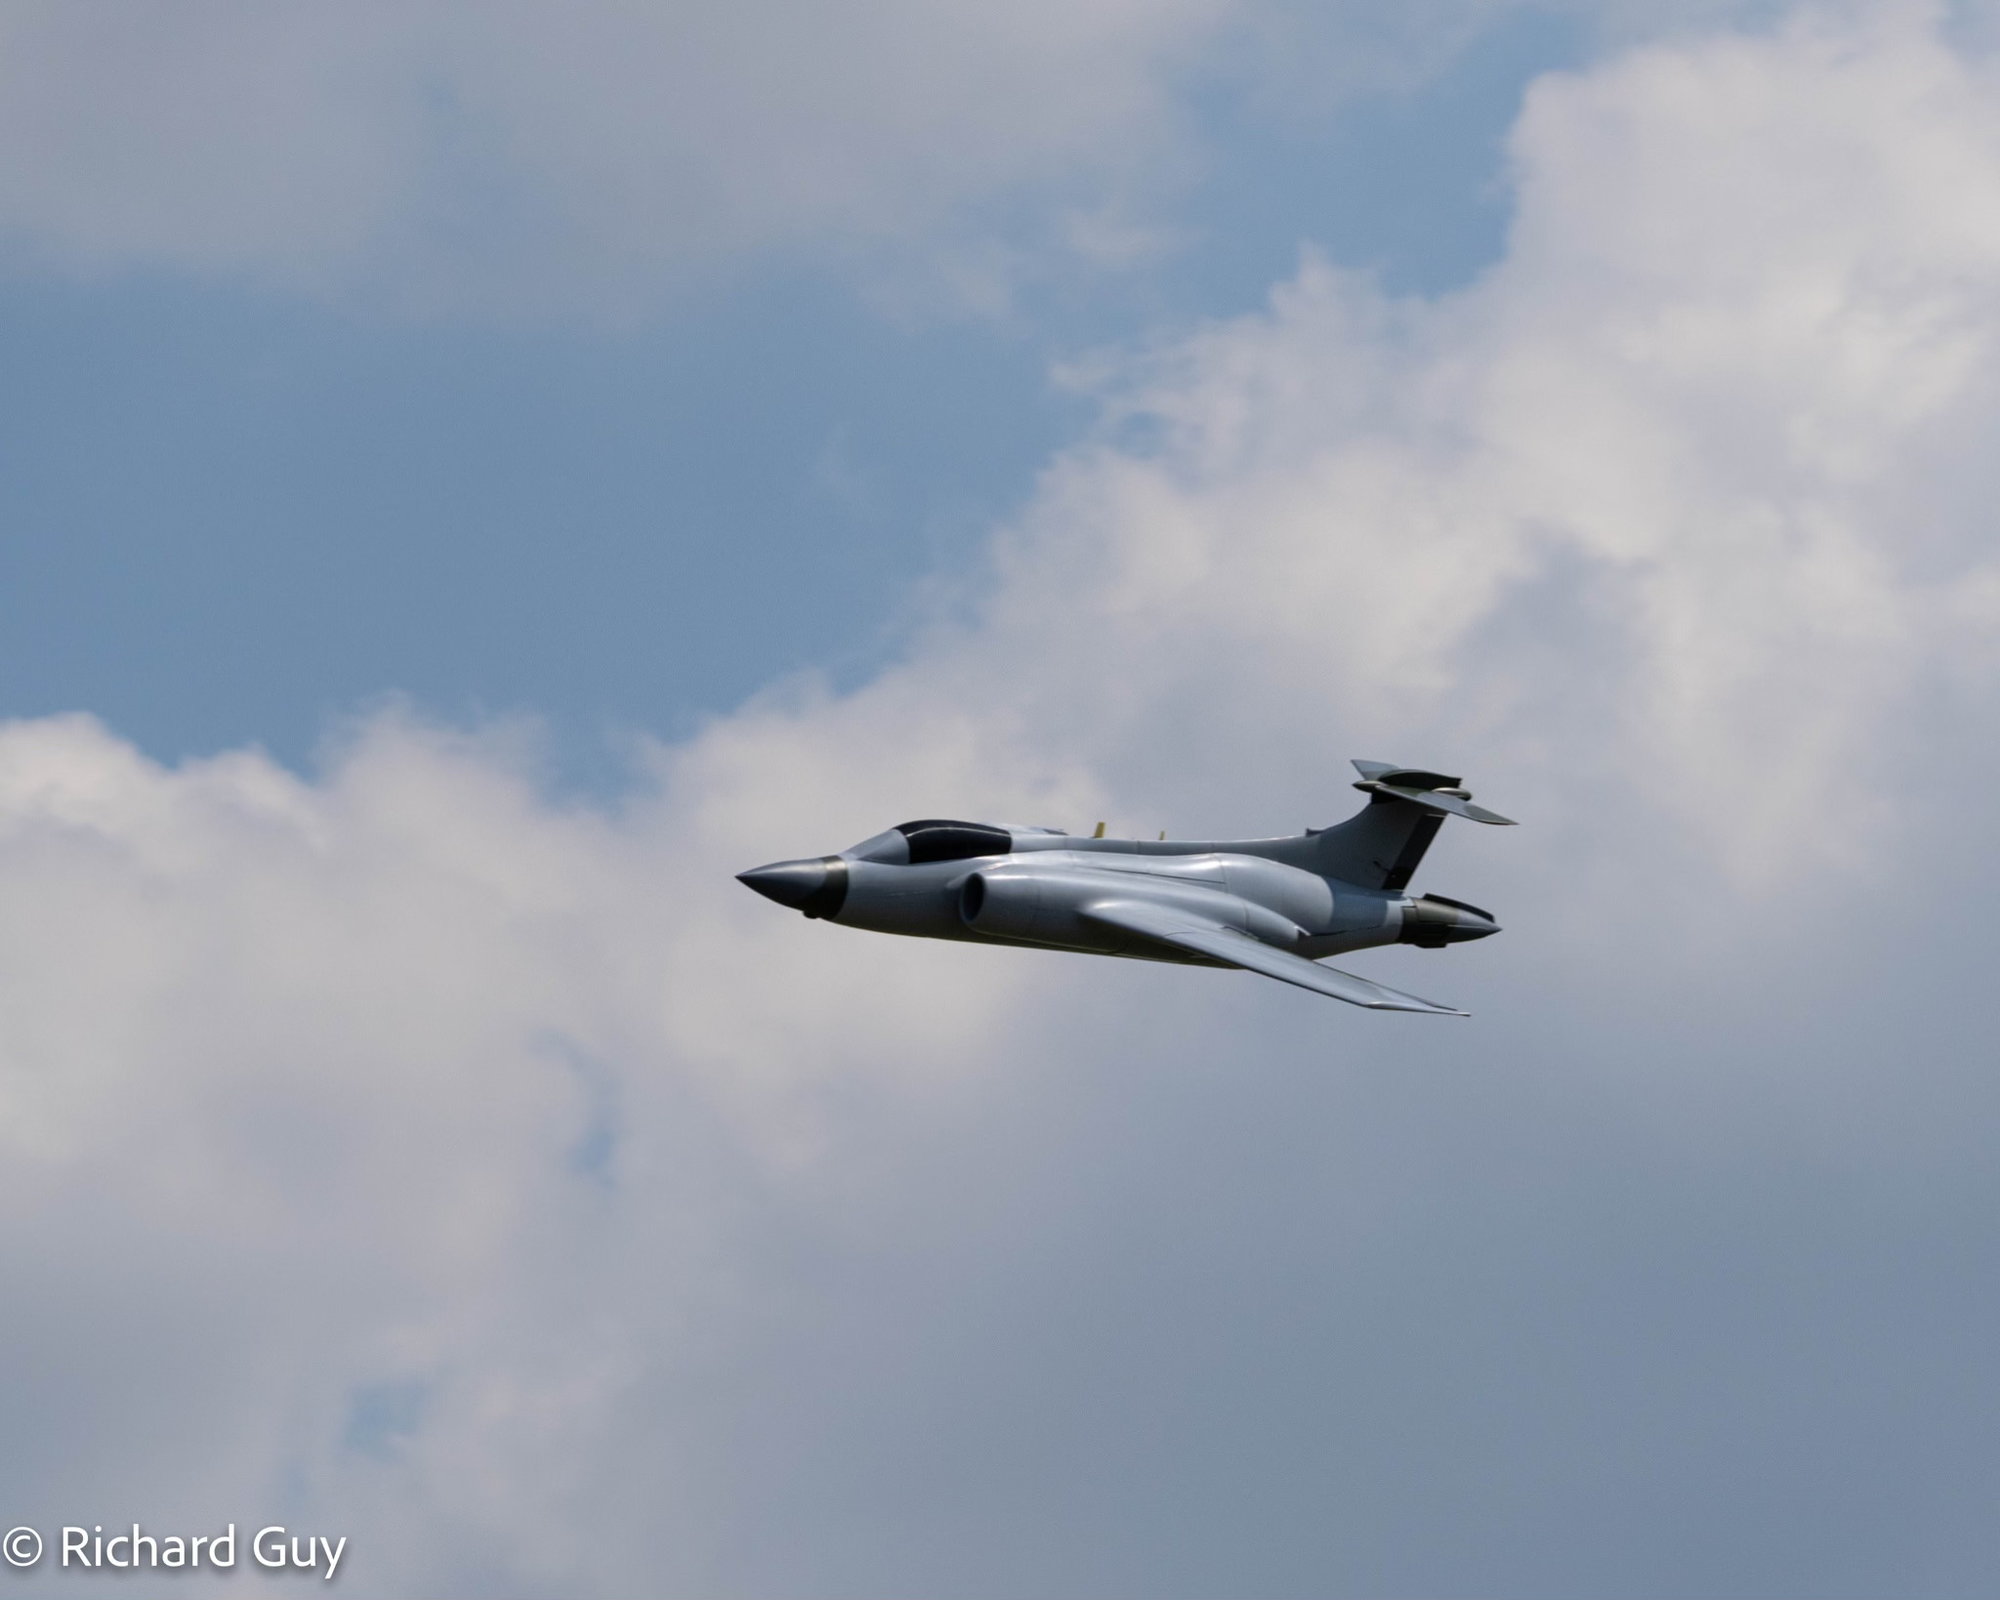
A couple of in-flight pictures - should get more soon, along with video.

I'm now motivated to finish the model, and add all the scale details to it, piece by piece. I'll try to fly it some more before stripping the fuselage for painting, over the winter.
I can definitely say that the 4 year journey has been worth it.
Paul
The first take-off was a bit 'exciting' as the model was out of trim in both pitch and roll, so the first few seconds were a bit of a roller-coaster until I got it headed away from the ground and settled down. The Jeti auto-trim function quickly helped dial out most of the trim issues during the first circuit. I left take off flap and the gear down for the first flight, just concentrating on getting the trim set and getting in tune with how it flew. It was a bit sensitive in roll, but one I brought the gyro online to a nominal gain setting the roll response settled down into a very predictable manner. I flew for around 5 minutes, with multiple practice approaches and overshoots before committing to a landing. I held power until the flare, just in case it wanted to sink, but it floated on by and landed in the second half of the runway, touching down smoothly. The new brakes were very effective and it came to a stop in less than 300ft, right at the end of Waco's 800ft runway. Taxy back and shutdown were normal. Time to relax and take a deep breath.
Following a check over, where no issues were found, flight 2 was flown. Now in trim, the take off was perfect with a smooth rotation and lift off. On the second circuit ,the gear was retracted with no trim change, followed by retracting the flaps. Some trim changes were noted and the trims were reset. I now had a very smooth and stable flying model that was flying happily at less than half throttle. After a few laps savoring the sight of some relatively low passes I lowered the gear and set take off flap. No issues in this config so I selected full flap, but it needed re-trimming so as I felt it was time to land, I elected to go back to take-off flap. The second landing was better, with idle being selected earlier and the touchdown was about center field, still with some float.
Third flight I tried a full stick roll - a little fast but easily fixed with adjusting the rates, then I spent time looking at full flap landing configuration.The model felt a handful, very sensitive in roll, which the gyro helped some, but it was still not comfortable, but I adjusted enough to fly the landing with full flap. No issues with the landing again.
Post flight I discovered that the aileron rate setting in landing flap flight mode was a lot higher than for take off and flaps up flight modes, so this was corrected, and all aileron rates were lowered a bit.
Flight 4 was very comfortable in all flight modes. The reduced aileron rates in landing flap transformed the model and it was now very predictable. One interesting characteristic that I need to investigate further is that with full flap (both inboard flaps and drooped flaperons), the model wants to constantly roll out of the turn back to wings level, and you have to hold in proverse roll stick throughout the turn. It feels strange, but easily adjusted to. The speed brake was opened in flight part-way, with nothing more than what was perceived to be a slight climb. A full flap landing was flown with the speed brake fully opened in the flare with touchdown again in center field. Tracking under full braking was along the center-line throughout.
Overall I managed 5 flights this weekend and each one was getting better and better, with minor adjustments after each one. The only other major item to investigate is the effect of the tailplane flaps - I have them on a slider and left them closed for these initial flights. I want to investigate the effect they have on elevator servo load (looking at overall current draw) before deciding on if I should mix them in with the flaps and flight modes.
I received lots of compliments, and received the Pilot's Choice award at the rally, even though it is not yet finished. Thanks to all that voted for the Bucc.
A couple of in-flight pictures - should get more soon, along with video.
I'm now motivated to finish the model, and add all the scale details to it, piece by piece. I'll try to fly it some more before stripping the fuselage for painting, over the winter.
I can definitely say that the 4 year journey has been worth it.
Paul
Last edited by JSF-TC; 09-11-2022 at 09:14 AM.
The following 8 users liked this post by JSF-TC:
BadBill (09-12-2022),
blackcat (09-14-2022),
Boomerang1 (09-11-2022),
grbaker (09-12-2022),
Halcyon66 (09-11-2022),
and 3 others liked this post.
09-11-2022, 09:30 AM
#694
The c.g. for first flight was set at a calculated 5.0%mac static margin and this was achieved without any ballast and was verified by hanging the model and it sitting level. The model felt stable, and the standard inverted 45deg climb c.g. check showed a gently nose drop. I don't see any need to fine tune the c.g further and will lock it in at 5.0%.
These flights showed that it is very adequately powered by 2 100 class motors (Merlin 100XBL). Apart from take off (at full power) all of the flights were flown at around half power or less. 179oz of fuel will give around 10min flight times, I currently have the timer set at 8mins, and was landing with 60-80oz of fuel remaining.
Paul
Last edited by JSF-TC; 09-11-2022 at 12:08 PM.
 09-11-2022, 10:25 AM
#696
Congrats - you stuck with it, and it appears to be flying great! Each flight got smoother than the previous. Now you can get onto more of the paint, and hopefully you'll be able to get rid of that big black thing where the canopy should be! It's gonna look cool when finally painted, and ready for those low passes... :-D
09-11-2022, 10:59 AM
#697
Congrarulations. Delighted to hear of your success, well deserved.
I was explaining the wing fold system to my grandson on a real Buccaneer S2 last week, you really have captured the lines of this iconic jet.
Just don’t paint it in that awful sand colour as used by the RAF during the Gulf War !
Again, hearty congratulations !
I was explaining the wing fold system to my grandson on a real Buccaneer S2 last week, you really have captured the lines of this iconic jet.
Just don’t paint it in that awful sand colour as used by the RAF during the Gulf War !
Again, hearty congratulations !
09-11-2022, 11:16 AM
#698
I second David's wishes concerning "that awful sand colour"... :-)
(Not sure what happened with my postings - can't post emoji's and can't post pics with captions as in the past...) :-(
I'm also assuming that "CG at 5%MAC" means really your CG is located 5% ahead of the airplane AC? For 5% static margin?
(Not sure what happened with my postings - can't post emoji's and can't post pics with captions as in the past...) :-(
I'm also assuming that "CG at 5%MAC" means really your CG is located 5% ahead of the airplane AC? For 5% static margin?
The following users liked this post:
Ron S (09-11-2022)